I have already showed ya'll how to make a nightgown from a pair of pillowcases.
I thought you might like to see how I made a convertible skirt or strapless dress from another pair of pillowcases. My mom gave me a huge bin of sheets and pillowcases from her overstuffed linen closet when she moved, and I have had lots of fun making things from sheets! This time I used a plain pair, in a soft sage green. I recently bought a new sewing machine that has a lot of embroidery stitches, and I made this to play with those stitches.
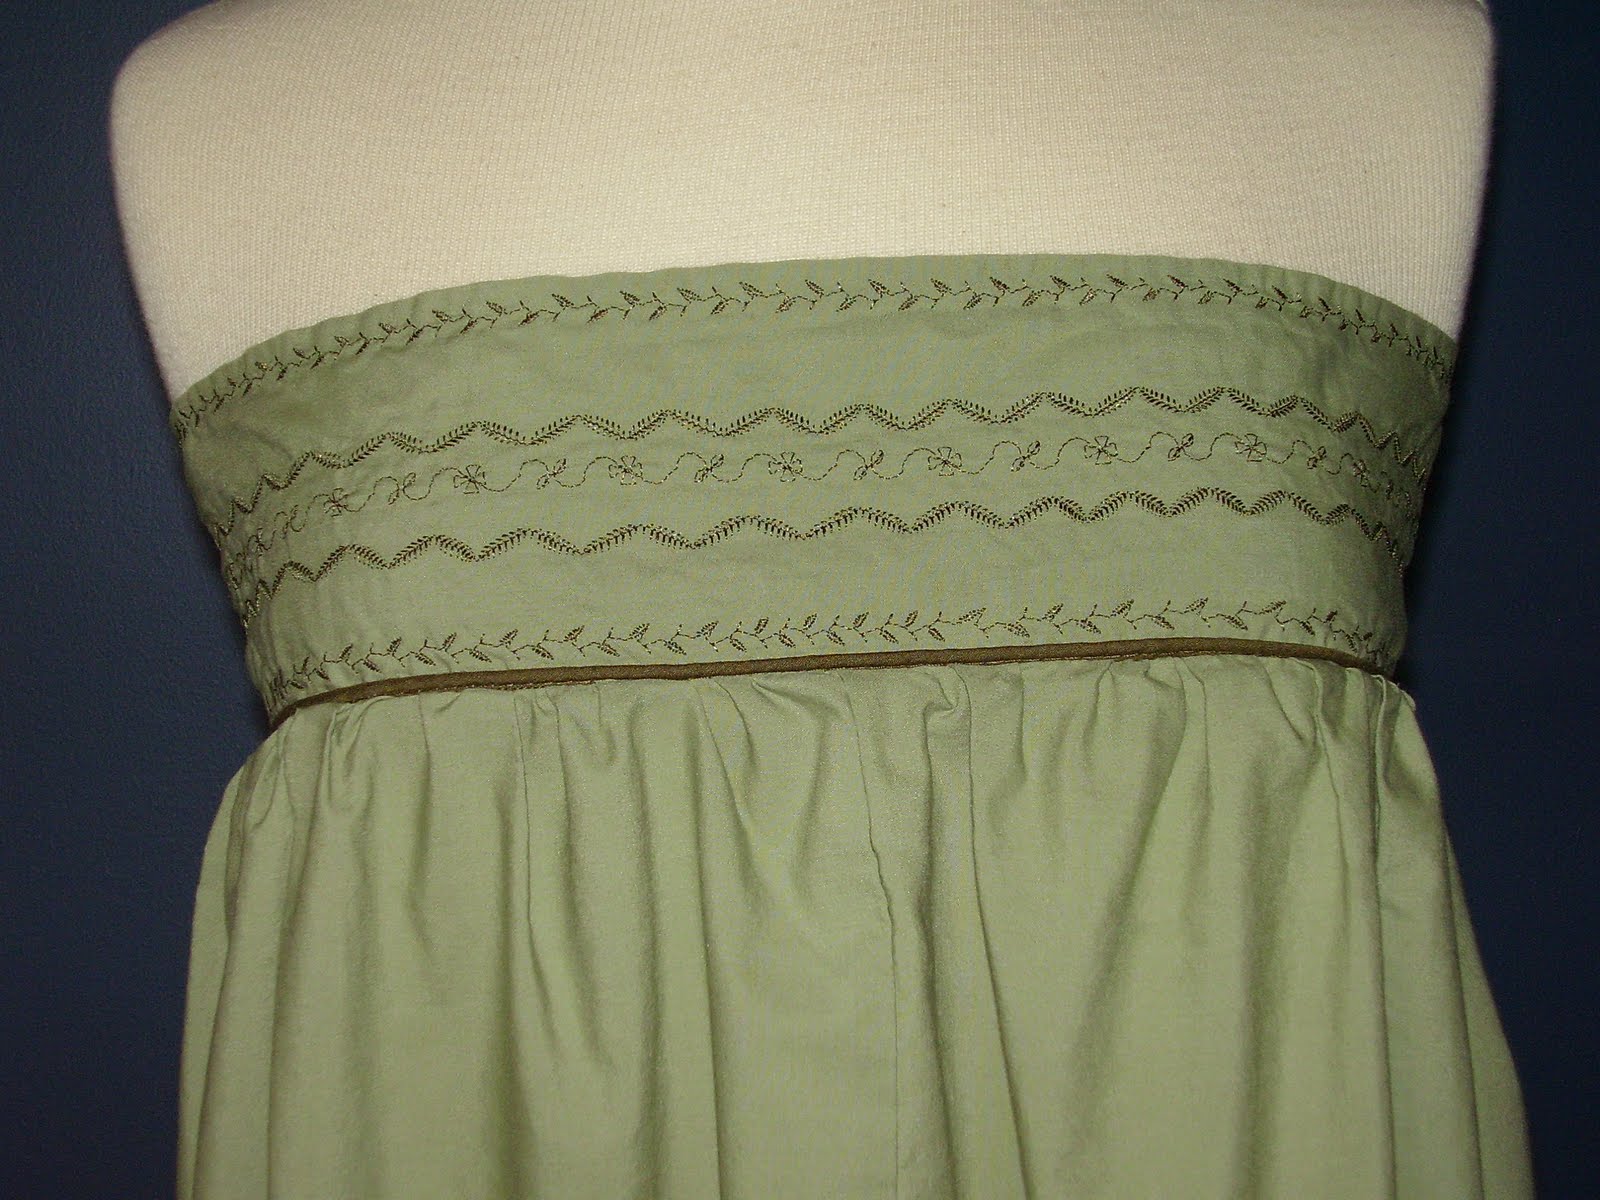
I can wear it like this, as a dress, or the way I usually wear this is as a low slung (it fits my hips) skirt. This was super simple and fun to make. This was my first successful attempt at using piping. I think the bias tape hem, the piping, and the embroidery make this garment really sweet. Mr. Green compliments me on this every time he sees it. Here is a closer picture of the embroidery:
Mr. Green shared his opinion that he thinks I must show this dress "with the green sweater."
I didn't make the sweater, though I wish I did. I actually am about to start working on something similar, in brown. I want to try Christine Hayne's jacket pattern using some yardage of a decorative, open knit I picked up on sale, lined with cotton gauze. I am hoping it will work! I have to dye the gauze brown first, and that sounds like something fun to do now. Maybe I will be able to show ya'll that jacket real soon!
But back to this convertible dress/ skirt. I removed the doubled, hemmed pillowcase band to make the embroidered skirt band. Then I cut apart the rest of both pillowcases, sewed them together, and gathered to fit the band, which I made to my measurement. Then I applied the piping, and sewed the skirt to the band. Because I had bias tape to match the piping, I used that to finish the hem, but both the piping and bias trim could be eliminated to make this easy to sew dress or skirt.
I will be back here soon. Until then, Happy Sewing!
Friday, July 30, 2010
If you cook meat, try My Meatloaf
I made my meatloaf (with turkey) last night and as we were just devouring the leftovers, Mr. Green asked me if I had shared that recipe here. I told him I didn't, that yahoo had published this recipe at Associated Content, but that I had not shared it on my blog. He insisted that I share it with you here, as he just loves loves the way I make meatloaf.
It's much different than the average meatloaf, as it has peppers and instead of oats or breadcrumbs, I use crushed cheese crackers (or you could use plain crackers, too). It's really really really good.
So, without further ado, here is the link to Aunt Millie's Garden Meatloaf.
Try it; I bet your family will love this, too.
It's much different than the average meatloaf, as it has peppers and instead of oats or breadcrumbs, I use crushed cheese crackers (or you could use plain crackers, too). It's really really really good.
So, without further ado, here is the link to Aunt Millie's Garden Meatloaf.
Try it; I bet your family will love this, too.
Labels:
easy things to make,
garden harvest,
recipes
Tuesday, July 27, 2010
Mess Management and Holiday Idea: Casserole Cozies
Please excuse me ya'll, for taking so long between this post and the last. I told ya'll that I make a mess, and I had to spend a whole day cleaning my big mess in the sewing room so I could think and sew. It was pretty ridiculous in there. The day before that, because of the mess, I spent making other things, not sewing. Then I started working with the softest yarns I have ever felt and making what I hope will be beautiful, my first scarf, honeycomb knit in two contrasting blues, a gift for my sister.
But I did finally clean the sewing room really well, and now I feel so much better! I am going to try to implement a new rule with myself, to clean up after I complete each project. I tend to want to run on to the next project. But mess upon mess accumulating beneath me contributes to insanity, lol, so I am going to work on cleaning up after myself throughout the day. We'll see how it goes....
And now for our project. When I got my copy of One Yard Wonders, this was the first project I saw that I knew I really needed to make. When I saw it, I immediately thought of last year, Christmas Day. We were supposed to already be at Grandmother Green's house and I was standing in our kitchen, looking at the hot dish from the oven, and wondering how on earth I was going to get it to Grandma's house. Mr. Green came in and assisted, and we wrapped it in towels and nested it inside of a collapsible beer cooler. I was embarrassed when Mr. Green had to walk into the party carrying that!
So I made this:
It will fit several different casserole sizes and shapes, including one considerably larger than the one that is inside in the picture. My sister told me she does not have one and would love one, so I made this:
I did not then have any more one yard cuts I wanted to use to make more. I did have a bit of the John Deere fabric remnant I had bought for my other sister, to make the oven mitt I showed you already, and so I used it for the straps and made this:
The last one I cut out, I cut from a partially ruined storebought quilt that came from Mr. Green's grandmother's house. I also used part of a quilted poly blanket that wouldn't be soft for a bed and that was given to me to reuse. I thought I wanted to use the quilt sides on the outside, and have the pink stripes showing on the inside bottom:
But now I am thinking I should turn the bottom piece over with the quilt showing on the inside and have the stripes on the table side. Any opinions?? I want to get more binding before I finish it, but should wait until notions are half off at Hancocks Fabrics, on August 13.
I think this casserole caddy makes a great gift. I plan to be on the lookout at the thrift store for some glass casserole dishes to give inside of them. Don't ya'll think that would make an amazing hostess gift, to show up with something delicious for the party, in a pretty and practical package the hostess can keep? I thought about making one from holiday fabric for this purpose, but I decided that is too limiting, as I will want to use mine all year. But there is your perfect present for someone who has everything already and who loves having Holiday "Stuff." She would probably love to have a Holiday theme cozy for her casserole!
This pattern is great because it fits different sizes and shapes of dishes, and also because of the design of the straps. Mr. Green pointed out how you can just slide it over your arm to carry, and have your hands free for carrying presents or whatever else.
Seriously, if you sew and you haven't gotten One Yard Wonders yet, buy it now!
I appreciate you ordering at Amazon through my links.
This book has 101 projects (and full sized patterns). I am thinking I will probably wind up making about 96 of them. Maybe more. I assure you you will find many projects in this book that you want to make too. There are clothes for ladies, babies, and children- even the dog; adorable toys; awesome things to make for the home; a selection of beautiful bags; precious things for pets; and plenty more. It has been the best book buy I have made for my sewing library. You should get it now for yours!
Have an amazing day and Happy Sewing! I will be back here real soon.
But I did finally clean the sewing room really well, and now I feel so much better! I am going to try to implement a new rule with myself, to clean up after I complete each project. I tend to want to run on to the next project. But mess upon mess accumulating beneath me contributes to insanity, lol, so I am going to work on cleaning up after myself throughout the day. We'll see how it goes....
And now for our project. When I got my copy of One Yard Wonders, this was the first project I saw that I knew I really needed to make. When I saw it, I immediately thought of last year, Christmas Day. We were supposed to already be at Grandmother Green's house and I was standing in our kitchen, looking at the hot dish from the oven, and wondering how on earth I was going to get it to Grandma's house. Mr. Green came in and assisted, and we wrapped it in towels and nested it inside of a collapsible beer cooler. I was embarrassed when Mr. Green had to walk into the party carrying that!
So I made this:
It will fit several different casserole sizes and shapes, including one considerably larger than the one that is inside in the picture. My sister told me she does not have one and would love one, so I made this:
I did not then have any more one yard cuts I wanted to use to make more. I did have a bit of the John Deere fabric remnant I had bought for my other sister, to make the oven mitt I showed you already, and so I used it for the straps and made this:
The last one I cut out, I cut from a partially ruined storebought quilt that came from Mr. Green's grandmother's house. I also used part of a quilted poly blanket that wouldn't be soft for a bed and that was given to me to reuse. I thought I wanted to use the quilt sides on the outside, and have the pink stripes showing on the inside bottom:
But now I am thinking I should turn the bottom piece over with the quilt showing on the inside and have the stripes on the table side. Any opinions?? I want to get more binding before I finish it, but should wait until notions are half off at Hancocks Fabrics, on August 13.
I think this casserole caddy makes a great gift. I plan to be on the lookout at the thrift store for some glass casserole dishes to give inside of them. Don't ya'll think that would make an amazing hostess gift, to show up with something delicious for the party, in a pretty and practical package the hostess can keep? I thought about making one from holiday fabric for this purpose, but I decided that is too limiting, as I will want to use mine all year. But there is your perfect present for someone who has everything already and who loves having Holiday "Stuff." She would probably love to have a Holiday theme cozy for her casserole!
This pattern is great because it fits different sizes and shapes of dishes, and also because of the design of the straps. Mr. Green pointed out how you can just slide it over your arm to carry, and have your hands free for carrying presents or whatever else.
Seriously, if you sew and you haven't gotten One Yard Wonders yet, buy it now!
I appreciate you ordering at Amazon through my links.
This book has 101 projects (and full sized patterns). I am thinking I will probably wind up making about 96 of them. Maybe more. I assure you you will find many projects in this book that you want to make too. There are clothes for ladies, babies, and children- even the dog; adorable toys; awesome things to make for the home; a selection of beautiful bags; precious things for pets; and plenty more. It has been the best book buy I have made for my sewing library. You should get it now for yours!
Have an amazing day and Happy Sewing! I will be back here real soon.
Friday, July 23, 2010
Handmade Gift Ideas Will Continue All Year
Hi! I have more than 2 full pages, front and back, of gift ideas to make and to show you. Some are tutorials I need to make, some are for projects from other creative folks that I want to make. I have only scratched off a small portion of these gift ideas and July is nearing its end.
So our holiday ideas in July continues, but will be extended throughout the rest of the year. Gift ideas to make will be a constant theme on this blog. You will also see here DIY fashions and clothing to make for everyone, as well as gardening and recipes. Whatever inspiration brings up and I make, I will show you.
The next post will be up soon, and it is a holiday idea.
I have also been busy with DIY summer fashions and I want to work on new dresses soon and so I am just letting ya'll know that my muse is demanding not to be restricted! So every post for the rest of July will not be limited to holiday ideas. Gift idea posts will continue, however, for the rest of the year. I have lots of cool ideas for easy gifts to make to show you. I hope no one will mind some fashion inspiration and other DIY interspersed as well.
I will be back soon. I hope everyone has a great day today!
Re-use-Full Gift Wrap!
I have been storing a lot of Christmas fabrics for several years, that were passed to me by someone else. This morning I decided to go ahead and get started on wrapping my presents and made small gift bags, as well as that holiday stocking gift bag, which has a drawstring flap inside it to prevent anything from spilling out.
So our holiday ideas in July continues, but will be extended throughout the rest of the year. Gift ideas to make will be a constant theme on this blog. You will also see here DIY fashions and clothing to make for everyone, as well as gardening and recipes. Whatever inspiration brings up and I make, I will show you.
The next post will be up soon, and it is a holiday idea.
I made this one for me and cut out three more for gifts. I will post this project as soon as they are done.
I have also been busy with DIY summer fashions and I want to work on new dresses soon and so I am just letting ya'll know that my muse is demanding not to be restricted! So every post for the rest of July will not be limited to holiday ideas. Gift idea posts will continue, however, for the rest of the year. I have lots of cool ideas for easy gifts to make to show you. I hope no one will mind some fashion inspiration and other DIY interspersed as well.
I will be back soon. I hope everyone has a great day today!
Labels:
bags,
easy things to make,
gifts,
recon/upcycling,
sewing
Thursday, July 22, 2010
Felt Food Inspiration
My fat little sprout is going to be nearly 2 in December, and I plan to make him lots of felt foods from Santa. I haven't started yet, because as I told ya'll in the soft ball post, I have been very unhappy with the acrylic felt that I can get locally. Just yesterday I found a good supplier for wool blend felt, and I plan to order some of that better stuff for making felt food. I will give you lots of links later in this post. But first, I want to show ya'll this, another awesome gift made by my friend Hilary:
Here is what she wrote about this gift:
I'm always striving to make thoughtful handmade presents. Because I'm on also on a very tight budget they also need to be low cost. This involves using materials found at thrift stores (and a lot of the time hand me down clothes,sheets,curtains,etc. from friends and family). Conveniently this also works out for being friendly to the earth.
Here's a gift I made for about $3. It was for a 2 yr old's birthday but I think it would be great as a Christmas present too. The lunch box was a thrift store find that I picked up a while ago.When I see something cute at the thrift store, I immediately start going through a mental gift recipient list to decide if I can actually use it or will it just become clutter. I knew right away the lunch box would get used.
I was a bit intimidated at first by all the great felt food out there, and my head was spinning with all the possibilities. I decided to make foods that the recipient actually eats and that brought me out of the whirlwind. But I quickly found that felt food is fun and pretty easy to make. Felt is very forgiving and I was able to just "wing it". And the present was a big hit(with the grown ups just as much as the kids)!
Happy Making!
Hilary
I have found so many great links for felt food tutorials that like Hilary, I don't know where to start!
The first link you will want to see is for "Felt Food Making 101," where you will find lots of advice on what felt, stitches, and needles to use, as well as some easy and simple tutorials. I have linked you to lesson 1, but be sure to read through all 5 lessons. This blog also has a store which sells wool and wool blend felts and other supplies.
I love Hilary's idea of using a thrifted lunchbox, but if you cannot find or don't want to buy a lunchbox, Litl Brown Bird's Passion has a tutorial for an adorable woven felt picnic basket. She also has a tutorial for a chinese take out box made of felt and some other cute things, too.
Skip to my Lou has an easy to follow tutorial for a complete brown bag lunch, including the bag and a cute little debbie swiss roll.
This mama on Craftster made a whole ton of stuff and shares instructions, too!
I just love the pancake tutorial at Turkey Feathers, and here is how to make a banana you can unpeel and corn in the husk I definitely plan to make these.
The Petite Cafe is a whole blog devoted to felt food making, and One Crafty Place has collected tons of felt food tutorials into a roundup.
Another place to find some awe inspiring felt foods is to google felt food tutorial and look on Google Images. This brings up more free tutorials, as well as some really amazing patterns you can order for pretend meals.
As soon as I get my wool blend felt, I know I will have tons of fun making a lot of these foods for my son.
Thank you to Hilary for sharing what she already made. I hope you all will comment and let her know what a great job she did!
I will post again soon. Until then, as Hilary said, Happy Making!
Here is what she wrote about this gift:
I'm always striving to make thoughtful handmade presents. Because I'm on also on a very tight budget they also need to be low cost. This involves using materials found at thrift stores (and a lot of the time hand me down clothes,sheets,curtains,etc. from friends and family). Conveniently this also works out for being friendly to the earth.
Here's a gift I made for about $3. It was for a 2 yr old's birthday but I think it would be great as a Christmas present too. The lunch box was a thrift store find that I picked up a while ago.When I see something cute at the thrift store, I immediately start going through a mental gift recipient list to decide if I can actually use it or will it just become clutter. I knew right away the lunch box would get used.
I was a bit intimidated at first by all the great felt food out there, and my head was spinning with all the possibilities. I decided to make foods that the recipient actually eats and that brought me out of the whirlwind. But I quickly found that felt food is fun and pretty easy to make. Felt is very forgiving and I was able to just "wing it". And the present was a big hit(with the grown ups just as much as the kids)!
Happy Making!
Hilary
I have found so many great links for felt food tutorials that like Hilary, I don't know where to start!
The first link you will want to see is for "Felt Food Making 101," where you will find lots of advice on what felt, stitches, and needles to use, as well as some easy and simple tutorials. I have linked you to lesson 1, but be sure to read through all 5 lessons. This blog also has a store which sells wool and wool blend felts and other supplies.
I love Hilary's idea of using a thrifted lunchbox, but if you cannot find or don't want to buy a lunchbox, Litl Brown Bird's Passion has a tutorial for an adorable woven felt picnic basket. She also has a tutorial for a chinese take out box made of felt and some other cute things, too.
Skip to my Lou has an easy to follow tutorial for a complete brown bag lunch, including the bag and a cute little debbie swiss roll.
This mama on Craftster made a whole ton of stuff and shares instructions, too!
I just love the pancake tutorial at Turkey Feathers, and here is how to make a banana you can unpeel and corn in the husk I definitely plan to make these.
The Petite Cafe is a whole blog devoted to felt food making, and One Crafty Place has collected tons of felt food tutorials into a roundup.
Another place to find some awe inspiring felt foods is to google felt food tutorial and look on Google Images. This brings up more free tutorials, as well as some really amazing patterns you can order for pretend meals.
As soon as I get my wool blend felt, I know I will have tons of fun making a lot of these foods for my son.
Thank you to Hilary for sharing what she already made. I hope you all will comment and let her know what a great job she did!
I will post again soon. Until then, as Hilary said, Happy Making!
Labels:
easy things to make,
gifts,
gifts for kids,
sewing
Subscribe to:
Posts (Atom)