Showing posts with label gifts for kids. Show all posts

Wednesday, December 21, 2016

Last Minute Gifts to Sew


My latest post at Sewing Machines Plus is a list of quick sewing projects that are perfect for last minute gifts. There are quite a few easy, quick, no-stress gift ideas that are fun to make. Good Luck with all your projects, and Happy Holidays!

Sunday, November 13, 2016

Gifts To Sew for Everyone on Your List


Are you starting to think about your holiday list yet? Do you plan to sew gifts this year? If you plan to, it's time to get started. I published a list of ideas for gifts to sew for everyone at Sewing Machines Plus. It includes some of my favorite gifts to sew for babies and kids, ladies, and men.

Click on over and read the list now at SMP: Sew Gifts for Everyone on Your List. I hope you find just the right ideas to add to your holiday sewing project list. I appreciate you reading my work and I hope you have a fabulous week.

Friday, May 4, 2012

Easy I-Spy Scrap Quilt

It's been a long time since I posted something new here, and this twin bed quilt seems like a good project to share.  I had been saving fabrics to make an I spy quilt for my son, and when we ordered his first twin mattress, I needed to make a twin bed quilt quick.  I didn't want to just sew square after plain square of random novelty fabrics; I wanted to do something to unify the quilt.  I am very happy with how this turned out, and I think the primary colored frames around the different I-spy prints work well to unify both the fabrics and the random collection of colorful toys that often litter my son's room!  I looked online a few times and couldn't find a design for an I spy quilt like this, but I finally found something on google images that inspired me.  That was this quilt, at Don't Call Me Betsy, which was the very first quilt she ever made!  It's an easy idea and I decided to use it in order to both unify and speed along the construction of my bed sized quilt, which I needed to sew quickly!


I finished this quilt so quickly that it was done before hubby has even started building the bed!

I used 6 inch squares for the block centers and 3 inch strips to frame them, and then trimmed each block to 11 inches square.  My son chose many of his I-spy fabrics, and some were such large prints that I used a few 11 inch square blocks without borders.  He was insistent about that Thomas the Tank Engine fabric, and this one didn't work well in 6 inch squares.  I used scrap and stash fabrics in primary colors to make the "frames," although for a few squares I used strips of the novelty I spy fabrics, when the print was small enough.

I used 2 of each fabric so he can also look for matches, as he likes matching games a lot right now.  To make this twin quilt takes 35 blocks, in 7 rows of 5, so you need 2 each of 17 different fabrics, one of which you will use 3 times.  To make this quilt harmonious, I stuck with a palette of mostly primary colors in the prints, and enhanced this by using reds, blues, and greens for the framing strips.

This is an easy, quick, I-spy quilt to sew that uses scraps but has a coherent quality that brings the diverse prints together in a fun way.


I am feeling quite quilt-y lately; I just finished a new top which I will quilt soon and I have a lot of quilt ideas swirling in my head, so I hope to make more posts again here soon.  I hope you and yours enjoy a beautiful day today and that you all have a beautiful tomorrow, too!  Happy Sewing!


Thursday, March 24, 2011

A Dress for Every Girl Around the World


Dress A Girl Around The World is an organization that I was glad to learn about, and I wanted to make sure that you all know about it, too.  The flyer above says "Imagine a world where every little girl owned at least one dress."  It is a sad thought that there are little girls who don't own a single dress, and this is something that we CAN do something about!  I am so happy to make pillowcase dresses to send to this organization, and I bet you all would like to do the same.

Pillowcase dresses are SUPER EASY to sew, as I have recently discovered.  You don't have to start with a pillowcase, but if you do they make up in about ten minutes.  You can make them in the traditional way, using bias strips under the arms and casings at the top:


Or you can use elastic across the top, and put casings under the arms, instead:


This didn't work that well for me, and I will never try to put casings under the arms again!  It would be better to use bias here, too; here are easy instructions at Rostitchery for a "safer pillowcase dress."
I will make the next ones this way, for sure.

As I said, you don't have to start with a pillowcase; you could start with a yard (or a bit less) of fabric, or even make one from a skirt:


So, I am sending these off to Dress a Girl Around the World now (after I clip those threads), but I plan to make more and better dresses soon, and send more again later.  I hope some of you will sew some pretty dresses to send for other little girls, too.  Please and thank you.

Happy Sewing!

Thursday, January 20, 2011

Sew Soft Toy Blocks and Upcycle Baby Clothes

Please visit Associated Content to read my tutorial for keepsake baby blocks.  I make my soft baby blocks differently by repurposing pieces of sweet baby clothes.  Cute appliques make cute blocks, but using premade appliques from baby's clothes helps this project to make up super quick.


These are great for stacking and safe throwing.  I think this is a cute way to upcycle and repurpose baby clothes that have been outgrown, stained, or ruined.  They make great nursery decorations, too.  These blocks are also a little addictive to make; my baby has a huge set of these because I am always coming across cute appliques and wanting to make just one or two more.  Please read my tutorial and make some for a child you love!  There are instructions included on how to get the jingle bell inside to jingle properly and not be muffled by the stuffing, as well as how to successfully make these using knit fabrics from baby onesies.


Thank you for reading my work at AC!  I hope you enjoy this project as much as I do, and I hope the toys you make are played with and loved as well as our set!  Happy Sewing!

Saturday, December 11, 2010

More Ideas for Easy Gifts to Sew

How is your holiday sewing coming along?

Even though I started in July, it looks like I will be finishing things up at the last minute yet again.  I have lots more gifts I still want to make!

Here are links to articles just published with ideas for more last-minute gifts to make:


Handkerchiefs are a great gift for your brother (or anyone else) 

Easy Gift to Make Your Husband (or another special guy)
 Trick out his sofa!

Great Gift to Make for Grandma 
(napkins)


Easy Gift to Sew for Your Kid-  roll-ups

Come back here soon for more ideas and some ideas for holiday wear for you and your kids.
Happy Sewing!

Wednesday, December 1, 2010

Ideas for Easy Gifts to Sew for Everyone on your list

If you are looking for ideas for gifts to sew, you will find lots of ideas in my sidebar here.

Please also read my article at Yahoo, Easy Gifts to Sew for Everyone.  There are more ideas there, as well as a very important link...if you do not yet know about the handmade holidays series that has been running all November for the past four years at SewMamaSew, then you will absolutely want to visit the link at the bottom of that article for scores of amazing gift ideas.

I am excited that yahoo just sent me an email to let me know that I have been accepted as a featured crafting contributor at Associated Content, so there will soon be many more crafting articles written by me on that site. I will still be sharing lots of ideas here, too, of course.  Here is the link to my contributor page  at Associated Content.  You can subscribe and be emailed whenever my new articles are published, and I would very much appreciate your readership there as well as here!

I am uber busy preparing for my first ever arts and craft booth at a local country Christmas fair this weekend, but I have a new tutorial for a sweet upcycled kid gift that should be posted here very soon, as well as other ideas to share.

In the meantime, Happy Sewing!

Thursday, July 22, 2010

Felt Food Inspiration

My fat little sprout is going to be nearly 2 in December, and I plan to make him lots of felt foods from Santa.  I haven't started yet, because as I told ya'll in the soft ball post, I have been very unhappy with the acrylic felt that I can get locally.  Just yesterday I found a good supplier for wool blend felt, and I plan to order some of that better stuff for making felt food.  I will give you lots of links later in this post.  But first, I want to show ya'll this, another awesome gift made by my friend Hilary:


Here is what she wrote about this gift:


I'm always striving to make thoughtful handmade presents. Because I'm on also on a very tight budget they also need to be low cost. This involves using materials found at thrift stores (and a lot of the time hand me down clothes,sheets,curtains,etc. from friends and family). Conveniently this also works out for being friendly to the earth.

Here's a gift I made for about $3. It was for a 2 yr old's birthday but I think it would be great as a Christmas present too. The lunch box was a thrift store find that I picked up a while ago.When I see something cute at the thrift store, I immediately start going through a mental gift recipient list to decide if I can actually use it or will it just become clutter.  I knew right away the lunch box would get used.

I was a bit intimidated at first by all the great felt food out there, and my head was spinning with all the possibilities.  I decided to make foods that the recipient actually eats and that brought me out of the whirlwind.  But I quickly found that felt food is fun and pretty easy to make.  Felt is very forgiving and I was able to just "wing it".  And the present was a big hit(with the grown ups just as much as the kids)!

Happy Making!
Hilary


I have found so many great links for felt food tutorials that like Hilary, I don't know where to start!

The first link you will want to see is for "Felt Food Making 101," where you will find lots of advice on what felt, stitches, and needles to use, as well as some easy and simple tutorials.  I have linked you to lesson 1, but be sure to read through all 5 lessons.  This blog also has a store which sells wool and wool blend felts and other supplies.


I love Hilary's idea of using a thrifted lunchbox, but if you cannot find or don't want to buy a lunchbox, Litl Brown Bird's Passion has a tutorial for an adorable woven felt picnic basket.  She also has a tutorial for a chinese take out box made of felt and some other cute things, too.


Skip to my Lou has an easy to follow tutorial for a complete brown bag lunch, including the bag and a cute little debbie swiss roll.


This mama on Craftster made a whole ton of stuff and shares instructions, too!


I just love the pancake tutorial at Turkey Feathers, and here is how to make a banana you can unpeel and corn in the husk   I definitely plan to make these.


The Petite Cafe is a whole blog devoted to felt food making, and One Crafty Place has collected tons of felt food tutorials into a roundup.


Another place to find some awe inspiring felt foods is to google felt food tutorial and look on Google Images.  This brings up more free tutorials, as well as some really amazing patterns you can order for pretend meals.


As soon as I get my wool blend felt, I know I will have tons of fun making a lot of these foods for my son.


Thank you to Hilary for sharing what she already made.  I hope you all will comment and let her know what a great job she did!


I will post again soon.  Until then, as Hilary said, Happy Making!

Wednesday, July 7, 2010

Gift Idea: Colored Pencil/ Crayon/ Marker Rolls

I am sorry I am late with this post.  Tuesday was a high intensity Mama day, as it rained, keeping my big boy inside, and my little guy wanted Mama to hold him all day.  I wasn't able to even go in the sewing room until nearly midnight. And then, once I started making these, I kept thinking of someone else who would like one.

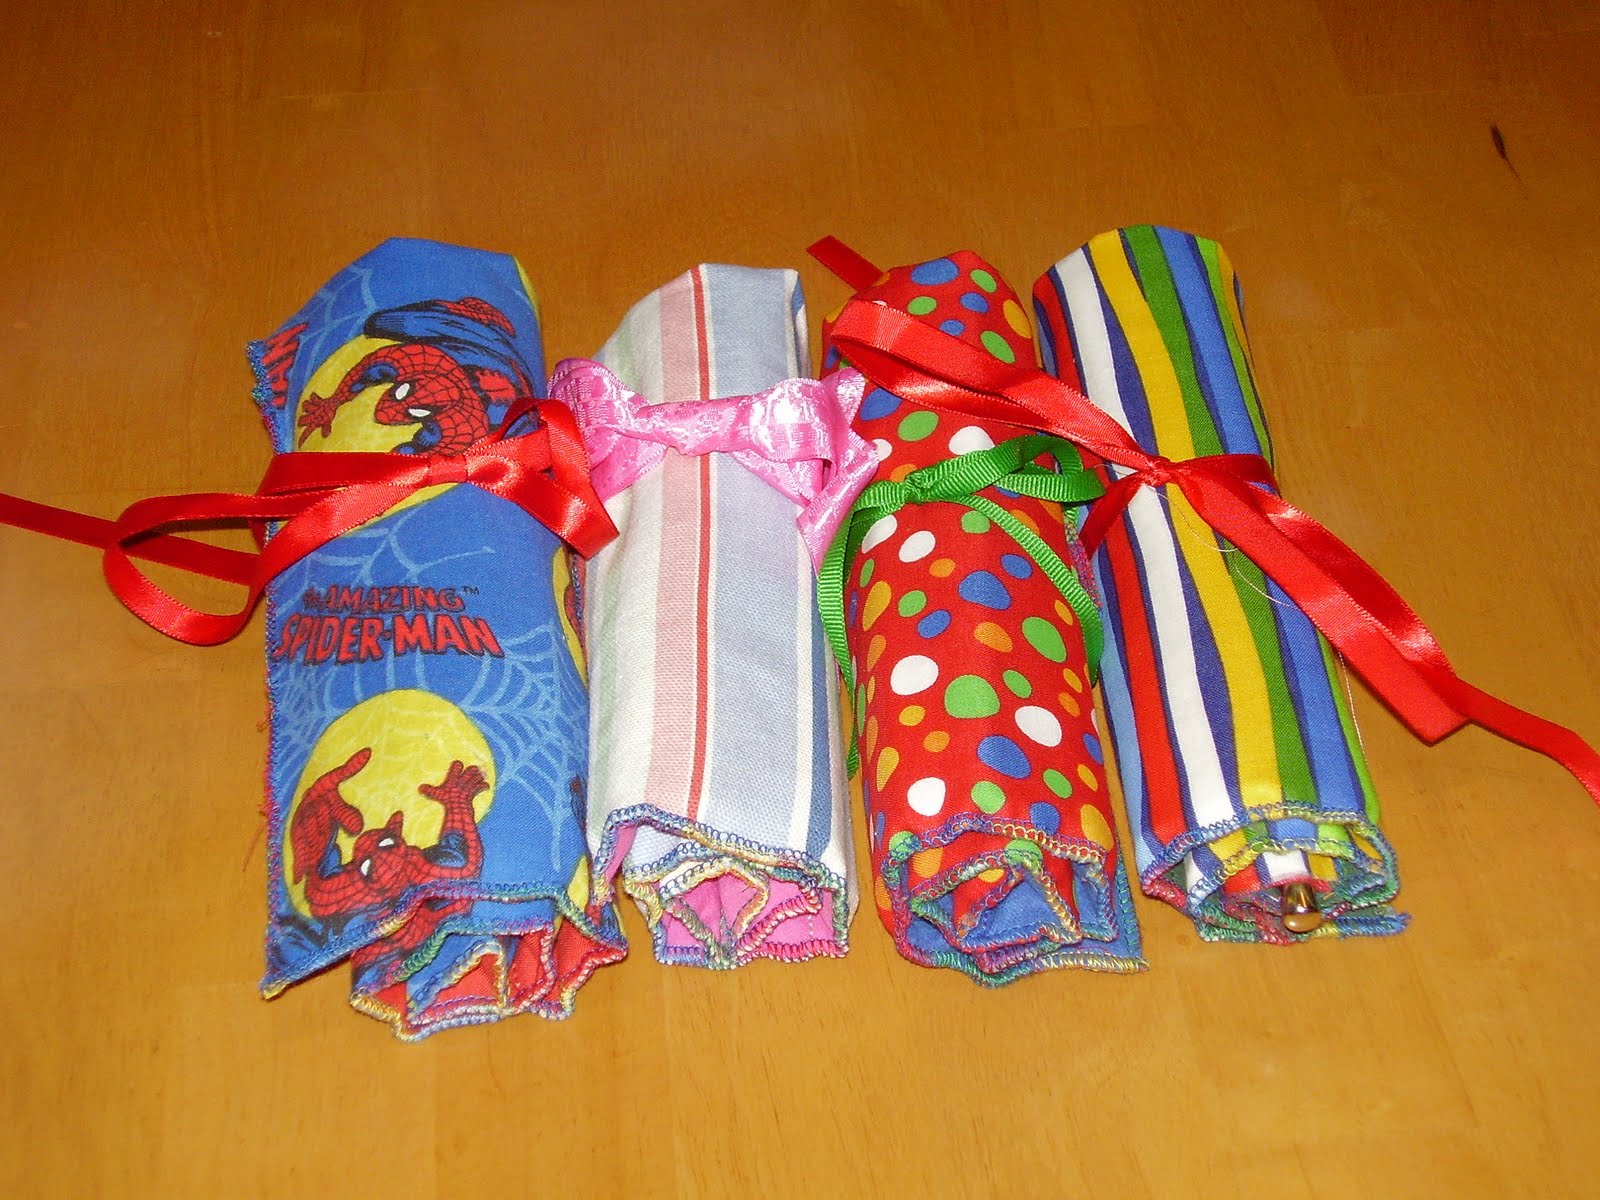
There are a lot of colored pencil roll tutorials to choose from, and every one I have seen is super cute.  I started with one from Carson J. Designs, although I made a couple changes.  I didn't have a cord stop, so I used ribbon instead.  And I also added an inner layer.  I have seen some tutorials call for a layer of flannel or fusible fleece.  I used what I had, which was a piece of canvas curtain.  I also used the serger to finish the edges, instead of turning...this speeds things up a lot.   Here is a view of the inside of one I made tonight:


And then I made three more.  The Spider Man is for a particular neighbor boy who is always wearing either one of two pairs of Spider Man shoes, or one of what must be a dozen different Spider Man shirts:


There are other tutorials for beautiful colored pencil rolls at You Go Girl  and  Pink Chalk Studio, and possibly elsewhere, as well.

After I finished these, I decided to do crayon rolls.  I had seen pictures of precious rolls at Skip to My Lou, but the little boys I am making these for will need the fat kind of crayons.  So I just kindof adapted the rolls I had just made, cutting the rainbow strips at 2" x 9":


I thought these should definitely have a fold down flap, to prevent the crayons being spilled in Mama's purse.
Here they are all rolled up:


I got all six of these gifts made in just about two hours, so you can see that these are quick and easy projects.  I really like sewing the rainbow strips together; it's like making a little quilt.

It is 3 am now, so I must go to bed.  If it wasn't so late I would like to make Fawnda's marker roll; there is a tutorial at Fireflies and Jellybeans.  I would like to make one of these for my sharpies, as well as some for gifts.  But that will have to be another day!

If you haven't seen my giveaway yet, please read this post.   Next Monday my baby will draw a name from a hat to determine the winner of my patchwork needle book/ sewing kit.  You need to comment on that post, or be a follower of this blog, for your chance to win it.

I am going to bed!  I hope to see ya'll tomorrow.

Monday, July 5, 2010

Gift Idea: Car Rolls

 I had plenty fabric left from that firetruck crib sheet that I used to make the toy box, and I decided to use it (along with pieces from 2 other sheets and a salvaged jeans leg for the road section) and make a car cozy.  I have made one of these before, using the great tutorial at My Little Gems.


I kept thinking as I was turning this right sides out that the process could be speeded up with the serger.  So I made another one in less than half the time, using rainbow variegated thread to finish the edges.


My baby will be ready for hot wheels by December, so I think he will just love this.  We also have a lot of sweet little boys on our street, so I am about to go back in my sewing room and use the rest of these fabrics (there is still more left of that crib sheet), to make at least a couple more.  These would make a great birthday gift, too, especially if you had one or two already made and could just grab it and go to a party.  They are perfect for slipping into Mama's purse so she has a great diversion to offer her boy while out and about.

There is also another beautiful tutorial for another way of making these at Homemade By Jill.  I haven't made one this way yet, but I have a piece of natural duck cloth and some paints and can think of a lot of fun ways to do this one.  Maybe I will try her way next.

And here is another variation on this project, this time at The Trendy Treehouse.  I just now saw this, and like me, I am sure you, too will see many fun possibilities for decorating this one.  I think I am about to break out my paints!  I hope ya'll have a great day!

Did you see this post yet?  I am giving away a sewing kit/ needle book made by me on Monday; you need to comment (or be a follower of this blog) for your chance to win it.