Showing posts with label organizers. Show all posts

Tuesday, February 8, 2011

Easy Quilting Project: Make a Wall Pocket from One Block

I have been working hard on rearranging my sewing room and making a lot of improvements.  I keep sitting down to make a post, looking at my photos, and thinking of another improvement to implement.  I have a lot of new ideas to show you soon.  For now, here is one little project I whipped up for my sewing room.  I used a UFO block that was never going to be a quilt.  I had planned to make a throw pillow cover from this block, but have since decided that we have more than enough throw pillows around here!

I always have a lot of garment pattern pieces tacked on my bulletin board, and this leaves no room for the other stuff I want to tack up.  So I used this orphan quilt block and made a big wall pocket for holding whatever garment pattern pieces I am working with.  I wrote a tutorial, too; here is the link to this easy quilting project.  Please stop by and read my tutorial at AC!


Happy Sewing!

Wednesday, October 27, 2010

Easy Sew Diaper Bag Alternative with Bonus: Upcycle / Repurpose Outgrown Baby Clothes


When you have a baby, besides carrying the baby, you also must carry baby things.  Some women ditch their purses and carry their things in a diaper bag instead.  But some of us prefer our purses.  And I, for one, really dislike having my things mixed in a jumble with the baby's things in an oversized bag.

So I came up with this simple idea, years ago, and it has always been a big hit.
My big baby never got to wear this little suit I found at the thrift store.  I just love corduroy, so I made it into his bag.

This one is a good bit bigger:


But if you turn the baby's bag toward you when you carry it, your purse shows:


(This is an old purse; but it was my favorite for years).

This works great for so many reasons.  I still get to carry my purse, without having baby things mixed with my own, and without lugging two separate bags.  It is an ideal solution to having to unpack and repack bags, too.  Say you are out and about and you drop your child off to stay with a grandmother or babysitter...you just unbutton baby's bag and leave it with baby and take yours with you.  Or if you run out to the store and leave baby with Daddy, you just disattach baby's bag and leave it at home.  The size is perfect for carrying a few disposable diapers and wipes, a burp rag, pacifier, bottle, toys, snacks, or whatever items you really need to carry for your baby.

And the bonus is great, because it is always sad when baby outgrows a favorite garment.  Now you can continue to enjoy a favorite bubble suit, jon-jon, overalls, or dress long after baby has outgrown it!  You will even use such a bag long after you need to carry it on your purse for your baby, too.  I use one to hold clothespins, one for keeping lady things corralled and accessible in the bathroom, and I have one made from a larger baby suit that I use as my knitting bag.  I sometimes strap this to my purse, and sometimes I just carry this one as a bag itself.


These couldn't be simpler to sew.  Just take any baby clothes item that has shoulder straps that button, snap or velcro.  Turn the garment inside out and sew the bottom closed with a short straight stitch.  That is it, you are done!  You can stitch the seam again for security, bt otherwise, turn it right side out, strap it on your bag, and go.  You may be surprised, as I was, to hear nearly every person who sees this exclaim at how clever and cute it is.   But more importantly, it is practical and convenient and works well.

Happy Sewing!


Creations by Kara


<br>http://www.thethriftyhome.com


Tuesday, August 3, 2010

Quick Gift Idea: Glasses Cases

Hi Ya'll.

Here is a super quick, super easy gift to sew.  I made one tonight to enclose within the folklore bag I made for a friend.  The One Yard Wonders book called for the yard to be used as the lining too, and by using another fabric to line the bag, I was able to save a nice bit of the bag fabric for more than one project like this.


I used the serger to finish the outside of the flap.  This was the tightest curve I have serged, and I had to go over it again....so it is not as neat as I wished it was, but it looks nice and pretty.

Glasses cases are the kind of simple project that you can whip up quickly and you don't need a pattern or tutorial.  The ones I have made in the past have been as simple as a rectangle...you really don't need a flap.

Here is mine, which I made from the leftover fabric from my sewing machine and serger covers.  My great great grandmother bought this polyester prequilted patchwork print fabric and my mother gave it to me, so it is a special fabric for me.


And then here is Mr. Green's.  I have made a total of 4 gifts (he got this - and other things-  for father's day) from this guitar print shirt that fit no one here!


I learned from this one that it is probably better not to use the serger on small projects you are going to turn!

I don't need to make more of these for gifts now, though, and that is why I showed you ours, too.  I do plan to make another glasses case for a Christmas gift, to go in another purse I plan to make, but those will be done on the Knifty Knitter looms.  I will show them after I make them.

I think a handmade glasses case would make a nice teacher gift, or for an uncle or aunt or grandpa... just about anyone could use a soft quilted holder for their glasses or sunglasses.  And you can make these up in a flash, so it is definitely an easy gift to sew to keep in mind!

I promise to be back really soon with another project.

Tuesday, July 20, 2010

Gift Idea: Easy Earrings and Earring Hanger from a Picture Frame


Okay, it's not sewing, sorry.  But making an earring hanger like this is super easy and for someone who needs it, a much appreciated gift.  I made a few of these last year as gifts, so this one I am showing you is mine.  Hanging on it in the photo are several easy pairs of earrings I made as gifts today, as well as a few I made already for me.

To make an earring hanger like this, all you need is a picture frame in whatever size you want to use.  I have found some nice 8"x10" size ones in my local dollar store.  Mine was made from a frame I already owned, after the glass was broken.  The only other supplies you need for this are a staple gun and staples (or tacks and a hammer) and some screen.  I got enough screen to make at least 10 of these by talking to the manager at the hardware store, who sold me what was left on a roll for less than a dollar.  So this neat gift can be very inexpensive to make.  Of course, you could spend significantly more buying an extra special frame.  You just remove the glass and the back of the frame, and staple or tack the screen tightly across the back.  I love having a convenient place to hang my earrings in pairs.

To make simple earrings, all you need is the jewelry findings, which are very inexpensive in craft stores.  You need the fishhook wires, tiny jump rings, and either small charms in pairs, or earwires for beads.  And a couple pairs of small pliers.  Of course there are infinite ways to make earrings, with wires and stringing and knotting beads and all kinds of other ways.  I am not a jewelry artist however, and I make jewelry very simply like this.  If you have not made jewelry before, this way is affordable, easy, satisfying, and quick.  I have made lots of earrings as gifts, and I often notice my sister or friends wearing the jewelry I have given them, so I know they are appreciated.

I like to make one beautiful pair of sterling earrings and hang them in the middle of an earring hanger as a gift.  Another thing you can do is make a pretty pair and hang them on a small rectangle of colored card and enclose them in a small 3"x5" clear zip or cellophane bag.  Then you can enclose a pretty handmade gift in with your cousin or aunt or faraway friend's holiday card.  They won't cost you more than a dollar or two and about ten or fifteen minutes, but will be something so much more special than just a card. 

I will be back soon with a neat gift to sew.  Until then, I hope all of you have a nice day.

Friday, July 16, 2010

Gifts to Make: Zip Bags for Everyone

Small zippered bags are really easy to make.  I have made lots of these for ladies, as cosmetic bags.  I made one today to save as a Christmas gift for a friend:


I have been thinking lately that these do not have to be for ladies only, and that anyone could use one.  So I made another gift, this one for a man.  I made it slightly larger so he can use it to hold toiletries, etc. for travelling.  This fabric was originally a shirt that no one here would wear, but the guitars are cool:


Then I made one, slightly smaller, for a nephew, for transporting his Legos:


You can buy bags already made by a beautiful mama for Legos on Etsy, at heartsongfarms.

I make these kind of bags by cutting rectangles from fabric, batting, and lining fabric, which I quilt together.  Then I attach the zipper.  After sewing the zipper in place, I sew it down neatly.  Then, I sew up the side seams.  Before I had a serger, I used to make binding for covering the seams and making it to look nice and neat inside.  Now I just use the serger.  Then I pinch the corners on the inside and sew them down, to make the bag flat on the bottom.  This is nice as it allows the bag to stand upright.  There must be a million different uses for these, and you can make one in about 15 minutes.  I think they make a great gift for anyone.

Before I leave, I will show you this other little bag I made.  I cut the pieces for this little bag by following the shapes of the folklore bag, but significantly smaller.  It took a bit longer than my simpler zip bags above, and I was not entirely pleased with my execution of this, but since I mentioned it before, I will show you; maybe it will give you an idea...


So now it's your turn.  Take an hour and make up several fast and cute bags now to stash away for holiday gifts.  It feels great to be crossing names of the gift list already.  Have fun!  I will be back soon.

Wednesday, July 7, 2010

Gift Idea: Colored Pencil/ Crayon/ Marker Rolls

I am sorry I am late with this post.  Tuesday was a high intensity Mama day, as it rained, keeping my big boy inside, and my little guy wanted Mama to hold him all day.  I wasn't able to even go in the sewing room until nearly midnight. And then, once I started making these, I kept thinking of someone else who would like one.

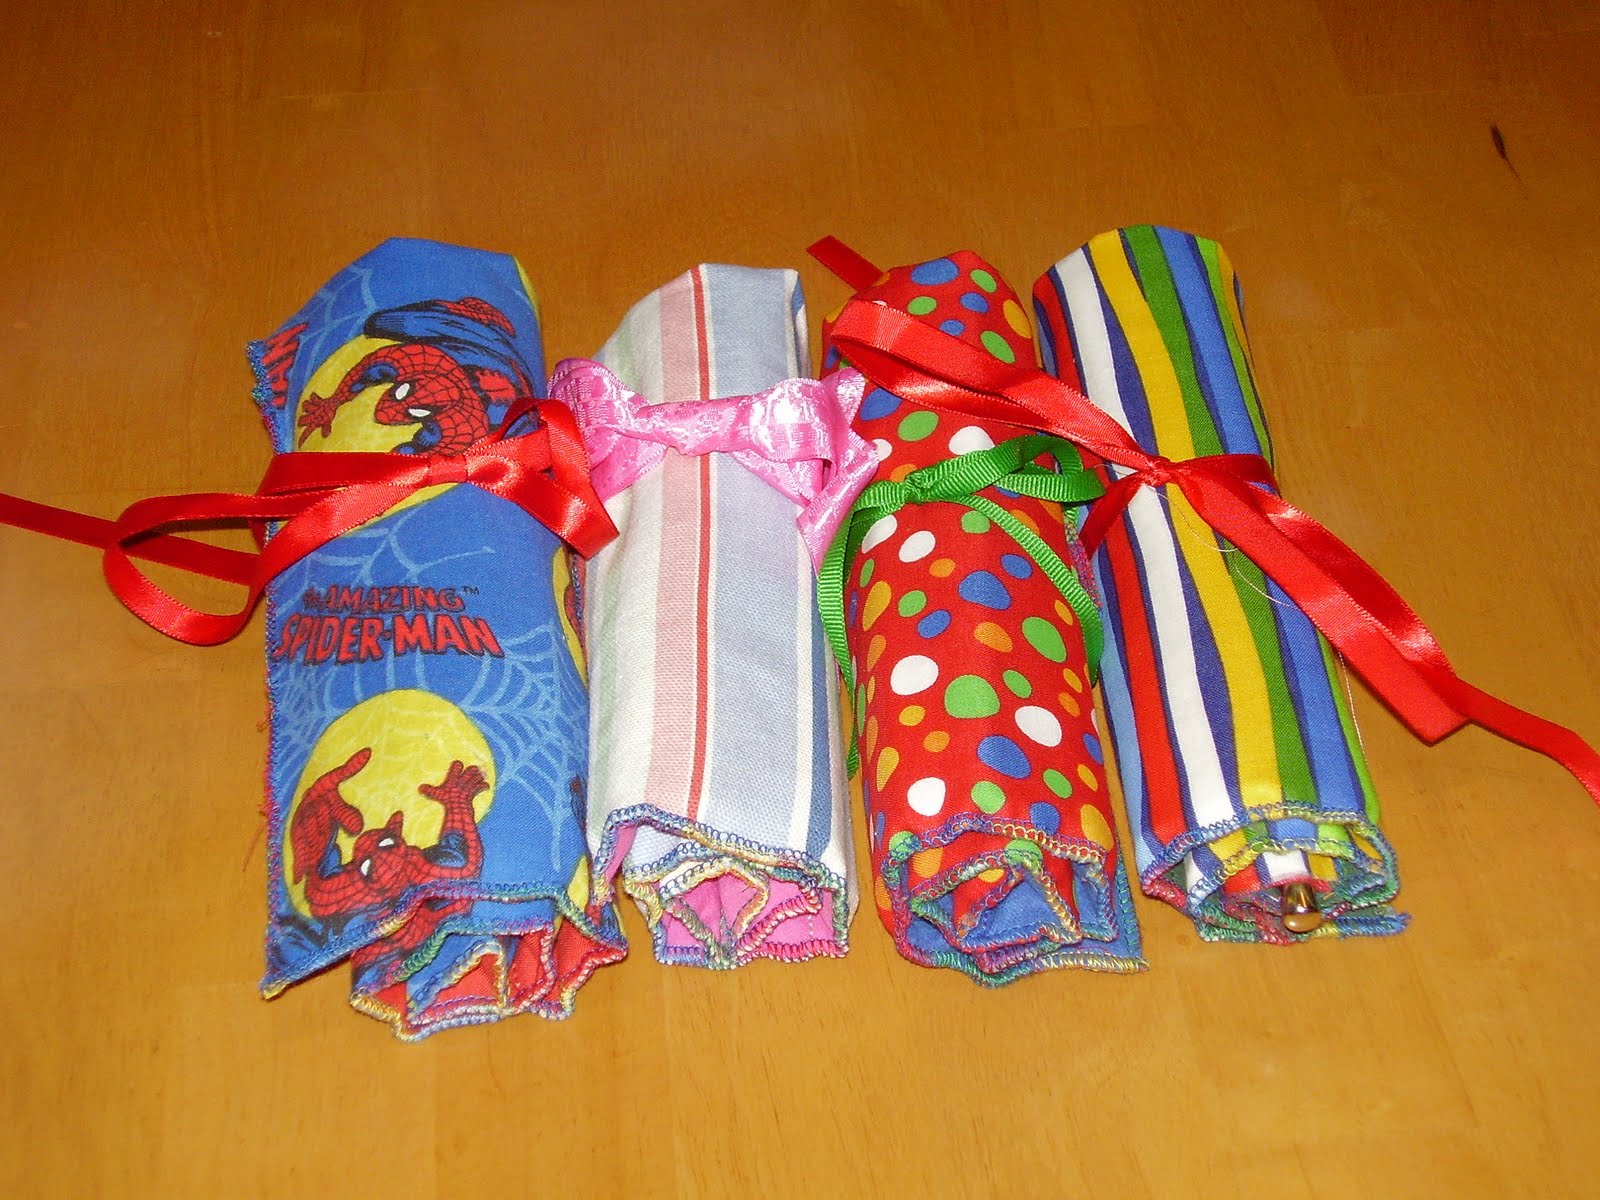
There are a lot of colored pencil roll tutorials to choose from, and every one I have seen is super cute.  I started with one from Carson J. Designs, although I made a couple changes.  I didn't have a cord stop, so I used ribbon instead.  And I also added an inner layer.  I have seen some tutorials call for a layer of flannel or fusible fleece.  I used what I had, which was a piece of canvas curtain.  I also used the serger to finish the edges, instead of turning...this speeds things up a lot.   Here is a view of the inside of one I made tonight:


And then I made three more.  The Spider Man is for a particular neighbor boy who is always wearing either one of two pairs of Spider Man shoes, or one of what must be a dozen different Spider Man shirts:


There are other tutorials for beautiful colored pencil rolls at You Go Girl  and  Pink Chalk Studio, and possibly elsewhere, as well.

After I finished these, I decided to do crayon rolls.  I had seen pictures of precious rolls at Skip to My Lou, but the little boys I am making these for will need the fat kind of crayons.  So I just kindof adapted the rolls I had just made, cutting the rainbow strips at 2" x 9":


I thought these should definitely have a fold down flap, to prevent the crayons being spilled in Mama's purse.
Here they are all rolled up:


I got all six of these gifts made in just about two hours, so you can see that these are quick and easy projects.  I really like sewing the rainbow strips together; it's like making a little quilt.

It is 3 am now, so I must go to bed.  If it wasn't so late I would like to make Fawnda's marker roll; there is a tutorial at Fireflies and Jellybeans.  I would like to make one of these for my sharpies, as well as some for gifts.  But that will have to be another day!

If you haven't seen my giveaway yet, please read this post.   Next Monday my baby will draw a name from a hat to determine the winner of my patchwork needle book/ sewing kit.  You need to comment on that post, or be a follower of this blog, for your chance to win it.

I am going to bed!  I hope to see ya'll tomorrow.

Monday, July 5, 2010

Gift Idea: Car Rolls

 I had plenty fabric left from that firetruck crib sheet that I used to make the toy box, and I decided to use it (along with pieces from 2 other sheets and a salvaged jeans leg for the road section) and make a car cozy.  I have made one of these before, using the great tutorial at My Little Gems.


I kept thinking as I was turning this right sides out that the process could be speeded up with the serger.  So I made another one in less than half the time, using rainbow variegated thread to finish the edges.


My baby will be ready for hot wheels by December, so I think he will just love this.  We also have a lot of sweet little boys on our street, so I am about to go back in my sewing room and use the rest of these fabrics (there is still more left of that crib sheet), to make at least a couple more.  These would make a great birthday gift, too, especially if you had one or two already made and could just grab it and go to a party.  They are perfect for slipping into Mama's purse so she has a great diversion to offer her boy while out and about.

There is also another beautiful tutorial for another way of making these at Homemade By Jill.  I haven't made one this way yet, but I have a piece of natural duck cloth and some paints and can think of a lot of fun ways to do this one.  Maybe I will try her way next.

And here is another variation on this project, this time at The Trendy Treehouse.  I just now saw this, and like me, I am sure you, too will see many fun possibilities for decorating this one.  I think I am about to break out my paints!  I hope ya'll have a great day!

Did you see this post yet?  I am giving away a sewing kit/ needle book made by me on Monday; you need to comment (or be a follower of this blog) for your chance to win it.

Saturday, July 3, 2010

Happy Holidays Gifts: Sewing and Needle Book- You Can Win It!

 Happy Saturday, Ya'll.

I haven't finished with the tutorial for this yet.  I want to make it a pdf file (which I will share with my followers as a gift, and sell after that), but I have a little learning to do first.  I hope you all don't mind waiting; I apologize!

But I can show you the first sewing and needle book I made.  This is the gift I am giving away next week.  And as I said, am working on making the instructions into a pdf file, so that you can make one for yourself or someone you love, too.


This is the front cover.  This little book has a zippered pocket to hold folding scissors, a seam ripper, needle threader, and quilter's thimble.  This little book is my original design; do not make these for sale.  If anyone wants to buy one, they will be available in several different cover designs in my Etsy shop, opening soon.

Here is a look at the inside:


This book is not exactly perfect, as I wish I had not used that darker green thread to sew closed the zip pocket.  Like I said, this was the first one I made!  It works just fine and I think it is pretty.


This is the back cover.  This project started when I bent to the scrap bag just to grab a little piece to test that orange/gold thread, which I hadn't used before.  Something inside me told me to make something pretty while I tried out the thread.  I made the patchwork piece that became the front cover, and when I looked at it, the idea for this little book just popped in my head!

I will announce the winner for this either Sunday evening or at the latest on Monday, July 12, 2010.  Comment on this post for a chance to win it.  Or, as I have said, to reward my loyal readers, if you are a follower of this blog I will put your name in the hat twice.  Three times if you comment!  I will let my 1 year old choose a name from the hat as the winner.

Good luck!  Ya'll have a great day; I will be back real soon.....

Friday, July 2, 2010

Crib Sheet to Toy Box Recon

Ever since I first heard about the Iron Crafter Challenge and the secret ingredient of sheets, I have been thinking about this crib sheet:


This will be my second entry in this challenge.
I removed the elastic from the edges and cut the corners so I could press the crib sheet before taking this picture.  My baby loves trucks and is quickly amassing quite the collection.  He really needs a box for his "cars" and I think this will be just the project for this sheet.  I also have some other sheets.


At first I wasn't sure which to use for this project, but the red sheet has already been cut and I have some navy bias tape I could use for the top edges.

So, you need the crib sheet (or whatever) and another sheet or pillowcase (or whatever) to use for the lining, some bias tape, which you can easily make from your sheet if you don't have any, and sheets of needlepoint canvas.  I used these because I had them, and because I want my box to be sturdy enough to stand up well.

Start by cutting 5 squares measuring 5 3/4" each,  from the crib sheet.  You also need 5 squares (again, 5.75") for the lining, and 5 squares of cotton batting.  I cut my batting squares a little bit larger, just to be safe.


Take one lining square and one front square and line them up right sides together, and then lay down one of your batting squares on top.  Sew with a 1/4" seam allowance on three sides, leaving the entire 4th side open for turning.  Now, you could just trim the edges and press and turn.  But I like to use the serger and I want to show you what it can do.  So, after I sew my 1/4" seams, I run them quickly under the serger.    I want to show you a picture, but I had a hard time taking one while serging.  It's blurry, but I will show you and hope you can see.  Notice at the top what has already passed through the serger has been trimmed neatly with the edges wrapped in thread.  At the bottom of the picture, you can see all the excess batting that is being trimmed as it goes into the serger.


Like I said, I am sorry this picture is so blurry!  Here you can see how nice and neat this looks after I have sergered all three sides:


So, do this on all 5 panels, and then turn them and press.  Then you will take a piece of the needlepoint canvas and trim it just small enough to slip into the panel.  Trim it on the top edge short enough that there will be enough room on the top edge to sew the binding on the machine without the needle hitting the canvas.  So, you use your bias tape to close up the open end on each panel.  Skip the bias on one panel and just turn under your raw edges and topstitch.  Now you have 4 panels like this (and one without the bias binding):


I have decided to reverse my bottom panel, so the firetrucks will show and the red will be on the floor.
Now you want to sew four side panels along their bottom edge to all four sides of the bottom square:


Now, this has all come together quickly.  But because of the plastic panels inside, I have decided I will have to hand sew the sides together.  So thread a needle and sit down and carefully and neatly sew up three of the sides.  Catch the lining on both sides with your needle, right at their edges.  On the fourth side seam, sew a little more than halfway up, and then stop, leaving your needle still threaded.


Now you want to turn the box outside out before finishing this last seam.  I will tell you it was scary turning this; I was afraid of the plastic panels cracking....but it turns just fine, just have patience and go slowly.  Once you get it turned, finish sewing the side seam and tie off.  And Voila:

Toy Box from a Crib Sheet

You can see he has already pulled out a truck.  He likes his new toy box and has moved it into the other room and emptied and refilled it and emptied it again.  I am glad its roomy enough to hold all his trucks and more and I am sure that any little boy would be happy to have a box filled with trucks!  Plus, I see endless variations on this.  You could use something pretty and make a bin for your crafts.  Or what about making another panel with a flap to make a velcro-able lid and then having pockets on the outside or inside (or both).  You could make a little flap to secure it around a seatbelt and have a neat place to store books and toys between kids in your car.  Or make more, in graduated sizes, and then they could stack and nest.

I hope you will make one or many neat boxes and I know you will have fun!  Have a great day!