Showing posts with label clothing: women's wear. Show all posts

Saturday, March 5, 2011

What's In Style for Spring/ Summer 2011: Women's Fashion Top Trends

Are you inspired to sew your wardrobe? I sure am, and many of the trends this Spring are great and easy styles for sewing yourself.  So what are the top trends for the season?  To find out, read my new article at Yahoo! Contributor Network, What's In Style for Spring 2011: Women's Fashion.  I appreciate you reading my work at Y!CN.


I am doing a lot of Spring wardrobe sewing myself, and I hope to show you a lot of the pieces.  The top trend this Spring is the jumpsuit, and I am definitely making a few for myself.  I started with McCall's Pattern 6083.

This pattern includes 2 different bodice styles and three lengths of pants.  I have learned to make a test garment first, and so I made a sunsuit, using the shorts length and the bandeau style bodice.  My Dolly can't wear pants, and so I have no model to show you, and I cannot photograph myself.  I took a picture of my short jumpsuit hanging on a hanger, and then laid out on my table, and these photos don't look good!  So I am going to have think about how to show off my jumpsuits; maybe I will get brave and model them myself, if Mr. Green will shoot the pictures.

Anyway, the short suit is cute and comfortable (and very easy to sew), and I will wear it in my backyard, not out and about.  I also will not make another with the same bodice, as I don't love it for me.  I do really like the fit of the shorts.  They have nice front pockets and are very comfortable with a great fit. I have just cut out another pair in the capri length, in black.  I am going to try the other bodice style with this, and make the top in white.  I will let you know how that bodice works out, for sure.

I am excited about making a different jumpsuit today, though.  The most recent issue of SewStylish magazine has instructions for combining the bodice and pants from Simplicity 2227 to make an "ultra-elegant jumpsuit."  I will be making mine with some flowing chambray colored cotton.  Once I do that, I want to work with the pattern I used for this nightgown to make a version in gauze, inspired by Ferragamo's lovely jumpsuit for this season. 

That Sew Stylish magazine had another great project, a knit wrap dress, which I made yesterday.  I still have to finish the belt ends....I have hesitated on this step, because I am thinking I might like mine to tie, instead of using a vintage wooden buckle as I had planned.  Once I decide and finish this dress, I will show you that as well.  Amazon does not appear to have the latest issue of this magazine, but I found mine at the fabric store; if you see it in line, you ought to pick it up.  I think there were about 6 different garment sewing patterns that I will definitely try, and there are many more than that in the whole issue.  This is not a sponsored post, by the way, and there has never been a sponsored post here at Sewing and Growing, just so you know.  I recommend things because I like them and think you will too. 

If you didn't click the link above, please click now to read my article What's In Style for Spring, please and thank you!  Happy Sewing!

P.S. I am adding this photo, because it felt like cheating to have nothing to show in this post!  Plus, as I said, I will wear this only in the privacy of my back yard, as it is short and skimpy...so I certainly will never be photographed wearing this!  It's cute though and I hope I will enjoy wearing it for gardening this summer, sorry the photo doesn't look good!  I left off the belt in the photo because it wouldn't hang right, it is the same as the neck ties, but wider.

Saturday, February 26, 2011

Spring Wardrobe Sewing: More Wrap Skirts and a T Refashion

Our weather is already starting to warm up.  So I put away the corduroy and fleece yardage that I haven't sewn yet; I will save those projects for later in the year.  Right now, I am sewing for Spring and Summer.

I already posted about the awesome and easy wrap skirt pattern in Chic and Simple Sewing.  But I am just loving this skirt so much that I made more.  I made a slight modification to the pattern on these, which are now better than the first three that I already showed here.  Instead of sewing the sides and then hemming the bottom, I rounded the bottom edges of the skirt and used the serger to hem the whole thing at once.  This works out better in the way that the skirt hangs, in my opinion.

First I made this one:

 
That T-shirt was much too big for me, but too small for Mr. Green, so I resized it and added elastic casings to the sleeves and the neck.  I guess this is really the first tee I have refashioned for me; I will wear it but the next tee I recon will be nicer than this turned out!  Dolly doesn't do the skirt justice, though; the length is exactly right and I love the colors...it really does look better on me than on her, I guess because my legs are so much nicer than hers!  lol

Here is another:


This skirt matches most every tee in my closet, including this blue one, which is one of my favorites.  I only had 2 yards of this patchworked shirting, and so I made the tie with a brown grosgrain ribbon.  I wear a close fitting muslin bias skirt under this.

I made one more wrap skirt, in a color (yellow gold) that I have never worn, but which says Summer happily...I will show that one later, when I have finished the top I am making up to go with it.

I know I said it before, but wrap skirts are super simple and easy to sew, and fun to wear, too.  I am excited to make some of the other dresses in Chic and Simple Sewing for Spring, too;  I hope to show those off soon, lol.

What have you been working on sewing for Spring?

Wednesday, February 16, 2011

Sew Easy Wrap Skirts for Your Wardrobe

If you haven't gotten Christine Hayne's book, Chic and Simple Sewing yet, here is another great reason to get this book.  A wrap skirt must be the absolute simplest kind of skirt to sew (if you have a good pattern), and I am loving this one. 


I made 2 of these skirts, from start to finish, before noon today. 


 This one was from the same vintage sheet I already used to make short jammies, a ruffled cafe curtain for my back door, and some heirloom seed packets and a covered canister, too!

I also finished up the first wrap skirt I started a long time ago.


This one is a little bit shorter; I messed up the hem when I tried to turn and sew it on the sewing machine, and so I had to trim it.  It is really a WHOLE LOT easier to use your serger to make rolled hems!

Last year I made lots of short bias skirts for the summer, but this year I think this wrap style will be my go to skirt pattern.  It uses 2 1/2 yards of fabric (as opposed to one yard, for the bias skirt), so this is a more ample and fuller skirt.  I am loving this skirt pattern so much for the nice swish-y effect!

There is not so much as even an elastic casing in this skirt, just straight, simple sewing- so this would be an awesome very first pattern for a new seamstress to sew.

I don't have any other yardage I can use for making more of these now, and I am restraining myself from going online fabric shopping.  But I know for sure I will be making a lot more of these wrap skirts.  This is such a classic, and yes, chic, style of skirt, that I know I will be able to wear them year after year.

There are a lot more awesome patterns besides this wrap skirt in Chic and Simple SewingHere you can see my little black dress, and here is another variation of that shift dress pattern, with sweet little sleeves.  I also made the jacket, and soon want to try out the opera and baby doll dress patterns.  You really should get this book now if you haven't!


I really appreciate you making all your amazon orders through links to Amazon on my site!  Happy Sewing!

Monday, November 1, 2010

My Best Bias Skirt Yet- and it's a Convertible Dress

I think corduroy is probably my favorite thing about fall.  I was thrilled to get several yards of this fine wale indigo dyed corduroy, and I really love this long bias skirt I made from it.


Yep, I cut this cotton corduroy on the bias, and it worked out just fine.  I drafted this pattern myself, using the one-yard wonders bias skirt pattern as a guide at the top.  I know this is going to be my favorite skirt I have made for myself yet.  But what is even better is that it doubles as a dress!


I love the weight of this cotton corduroy, which is not too heavy, and I can totally see wearing this over my bathing suit (or just as a dress) at the end of the day in summer.  I predict I will be making a navy swimsuit when spring fever starts to set in early next year!

I finished the bottom hem of this skirt with narrow regular serging (after I broke two heavy duty needles trying to roll the hem on this corduroy) and then I used this special ric rac-ish trim over the serged edge.  This skirt could not have been easier to sew.   If you have the same (or nearly the same) chest and hip measurements, as do Dolly and me, then you can easily make a 2-in-1 convertible long skirt and dress, too.

I had more of this fabric and next I will show you my jacket....

Happy Sewing!

Easy Blouse to Sew: Simplicity 3750

I already showed ya'll the sleeveless top I made for summer using Simplicity 3750.

I wanted to try the version B with long sleeves.  I cut this blouse a size smaller than the first version of this pattern I sewed.  So I partially made this one as a muslin (I recycled a sheet), but I figured it would be a useful wardrobe piece in white, and I will definitely wear this.


 Here is the back:


I hate to say this, but I have gotten a little fatter than Dolly, and so my things look a little big on her.  I need to either lose a couple of inches or fatten her up somehow.  That's a project for next year.  lol

This pattern is really easy.  I notice there are a lot of garment patterns that say Easy but aren't.  This one is and would be easy to sew for anyone who can run a machine.  The most complicated detail in this blouse is gathering, which is easy to do.  If you haven't sewn a blouse before and want to, don't be afraid to sew this one.  I like Simplicity patterns; their instructions are clear and easy to follow, plus they are easily affordable.

Both Jo-Ann's and Hancock regularly run sales for Simplicity patterns for a dollar; that's when I buy mine.  I like to sew frugal.  Considering that white sheet cost me nothing this blouse was certainly worth my time.

I am going to post that skirt she is wearing next...it's a convertible dress.

Have a great day!

Thursday, October 28, 2010

My Favorite Bias Skirt from One Yard

I keep showing ya'll the awesome projects I have made following patterns in the book One-Yard Wonders, because I know ya'll would like to make them too.

I am not sure how I haven't said much yet about the bias skirt pattern in this book, because this has been my most loved and favorite project I have made from the book yet.

I have made 6 or 7 of these bias skirts and worn one most every day for months now.  Here is my most favorite:


Besides the awesomeness of making a skirt from just a yard of fabric, this skirt pattern is super easy, too.  If you use your serger to roll the hem, as I do, you can make one in under half an hour.  The bias cut is super flattering and the elastic waist is most comfortable for a skirt.  I have found that this pattern, cut just a tiny bit smaller, makes an excellent half slip, too.   This pattern alone has been worth the price I paid for this book.

As you all know, I highly recommend this book chock full of (101) easy sewing projects to wear, use, and give as gifts.  If you haven't yet, you should buy it now

I will be back soon; Happy Sewing!

Monday, October 25, 2010

Chic and Simple Sewing Fall Dress = Easy Holiday Dress to Sew

I made this dress to wear for Thanksgiving:


I made this easy dress to sew by following the "back to school shift dress" pattern in Christine Haynes book, Chic and Simple Sewing.


I already said a lot about this awesome book when I showed ya'll my little black dress.  I will say again that this book is PERFECT for a beginner who has never made clothes before.  Because of the fact that it includes a whole wardrobe of patterns, and because every single one of the patterns are easy to sew.  There must be at least half a dozen different dress patterns you could choose from to make a holiday dress.  I will soon try to make "the opera dress," and  I am about to make one of the jackets from this book tonight.


But this post is about this dress.  I wish I knew what fabric it is made from!

The other night I was watching Project Runway, where Christian Siriano was the guest judge, and he commented about how Michael Costello did not know what fabric he made his BEAUTIFUL black dress from (speaking of chic and simple; it was inspired by the statue of liberty).  But Michael Kors said, basically, -it doesn't matter, he knew what to do with it!  And Michael Costello certainly DOES know what to do with fabric; even though he wasn't chosen as the winner, I predict he will be the stand out success story from this challenge.  I hope Mondo goes far as well.

-I mentioned that story as an aside to soften my stupidity, because the fact is that I made a really dumb mistake (never to be repeated) in the fabric store. What happened is that I made a rare shopping trip on an occasion when I had plenty of discretionary money to spend.  lol  And there was an unannounced 50% off sale, as well as rows of bolts for ridiculously low prices.  I did exercise restraint and I thought I was being careful, but WRONG.  lol  I should have looked at the bolt ends!

Always pay careful attention to what you are buying, people, when you are in the fabric store!


When I cut out the dress, I set the iron on low and pressed the backside.  But my iron leaked some water and put a (nearly invisible round) spot on my fabric and there is another place where if you look closely there is an iron mark.   

This fabric (my baby's favorite color now: "puh pul") is plush with a nap, velvety, lovely, and must be DRY CLEAN ONLY which is something I should not buy (unless I know for sure what I am doing.  :)  lol

So today I decided to finish the dress, and I like it a lot.  It is perfect for Thanksgiving; the loose fit means I can get full and fat.  And the color is a good one for this season, according to Vogue Patterns (fall issue 2010).  I didn't put the pockets on this dress to save enough fabric to make a fabulous structured handbag.

So, I am wondering if I can wash this dress made from unknown fabric in my new front loading washer (oooh I LOVE it, and the dryer; they are Frigidaire Affinity).
Thanks, Mr. Green!  Let's let them show their affinity and remove the space between them

Search Amazon.com for frigidaire affinity


A front loading washer washes TWICE as many clothes so you use half the soap in half the time, AND it makes almost no noise....not to mention saving tons of water.


Maybe it could fix the spotting and not ruin the dress.  I am also tempted to cut this off to a tunic length top (the affected area is lower on the dress).  and I am wondering about pairing it with some champagne colored yardage I have, for slacks or a skirt.   I would rather just leave this a finished dress and make this pattern again as a top, though, maybe with the champagne.

If I actually take it to the dry cleaners can they fix the spotting, or could that make it show worse?  As it is now, you really can barely see the spot unless you are looking for it.  Have you ever washed a dry clean only fabric and had it work out?  I would love to know!


handmade projects

Wednesday, August 4, 2010

Easy Summer Seperates To Sew

I just made this top, using Simplicity pattern 3750

 
 And here is the back:


It is not really uneven in the back; I didn't notice it needed to be pulled down before I took the pic!

This is the first top I have made following a pattern, other than the pajama top in One Yard Wonders.

I made this top more complicated than it needed to be by choosing the striped print.

This is an easy pattern to sew, for sure.  It has a lot of sleeve options, too.  I am excited about making one  with the "groovy" long sleeve option.   That will go with a long bias cut skirt I have already cut out and I cannot wait to show that completed outfit, which is for fall.


I have been wanting to show ya'll the bias cut skirts from One-Yard Wonders, but wanted to show a whole outfit made by me, and not just a bunch of skirts.  And so I bought the fabric for this top, along with some special blue linen to make the skirt.  But the linen has flower embroidery (in the same shade) and is gorgeous, but needs a plain blouse.

Dolly IS wearing a bias cut skirt in the photo, but I made that one from a sheet as a little slip to wear under a floral circle cut skirt I made from another sheet....

But I digress.  lol  The big mistake I made in sewing this pattern was not paying enough attention to the instructions and sewing the bias tape to the strap and back pieces before sewing them together.  So there is a seam at the neck, which should have been seamlessly bound.  And the contrast band could have looked neater.

I also choose one size too large, apparently.  If you haven't followed a pattern before, please be aware that you definitely will need to make a different size than you normally buy.  I wear a size 6 dress if I buy it from a store, but a garment made from a size 6 pattern would not go over my thigh.  The back of the pattern has measurements, and I did consult them.  I even measured myself again, to be certain my measurements had not changed.  So I choose and cut my size according to the stated measurements, but it is too loose under the arms and in the chest.  I am going to take it in better, but when I repeat this pattern, I will be cutting a smaller size, for sure!

I am pleased in general with how this top turned out (Mr. Green complimented on it before it was even finished and has commented he likes it several times), and I will definitely be wearing this and make the pattern again, especially with the sleeve variations, which I am eager to try.  And I definitely learned several things during the process.

I also really want to tell ya'll about the bias cut skirts from the book
One-Yard Wonders: 101 Sewing Fabric Projects; Look How Much You Can Make with Just One Yard of Fabric! 
In case you haven't figured it out; I really recommend adding this book to your sewing library.
This one pattern alone has been worth more to me than the price I paid for that book.  It is a one piece pattern and super simple to sew.  Because I have a serger to roll the hem, I can sew one in literally 10 minutes.

Here is the very first one I made.


I couldn't find my tie dye to show you today, but when my mama brought me this vintage sheet, I immediately thought of my favorite old tie dye I made with rit dye that has the same faded shades of brown and orange.  That tie dye and this skirt have been my favorite outfit for around the house all summer.  I used another soft cotton sheet to make the bias skirt pattern in a smaller size to wear underneath as a slip, and it makes for a breezy, comfy, cool skirt.  You can see another one cut out on the line in the window.  I need to get brown thread for the serger before I hem that one.  You don't need a serger at all to make this easy skirt, however.  You can make one from a yard of 60" wide fabric.

You will be seeing other versions of this skirt by me (including the embroidered linen and a special long version) soon, as I complete tops to go with them.

There is a sewing and needle book in that last photo, on the stack on the sewing desk.  I have only a couple steps left on that and the tutorial for those should be up soon.


I hope you all have a great day today; Happy Sewing!

Friday, July 30, 2010

Ladies Embroidered Dress or Skirt from a Pair of Pillowcases

I have already showed ya'll how to make a nightgown from a pair of pillowcases.

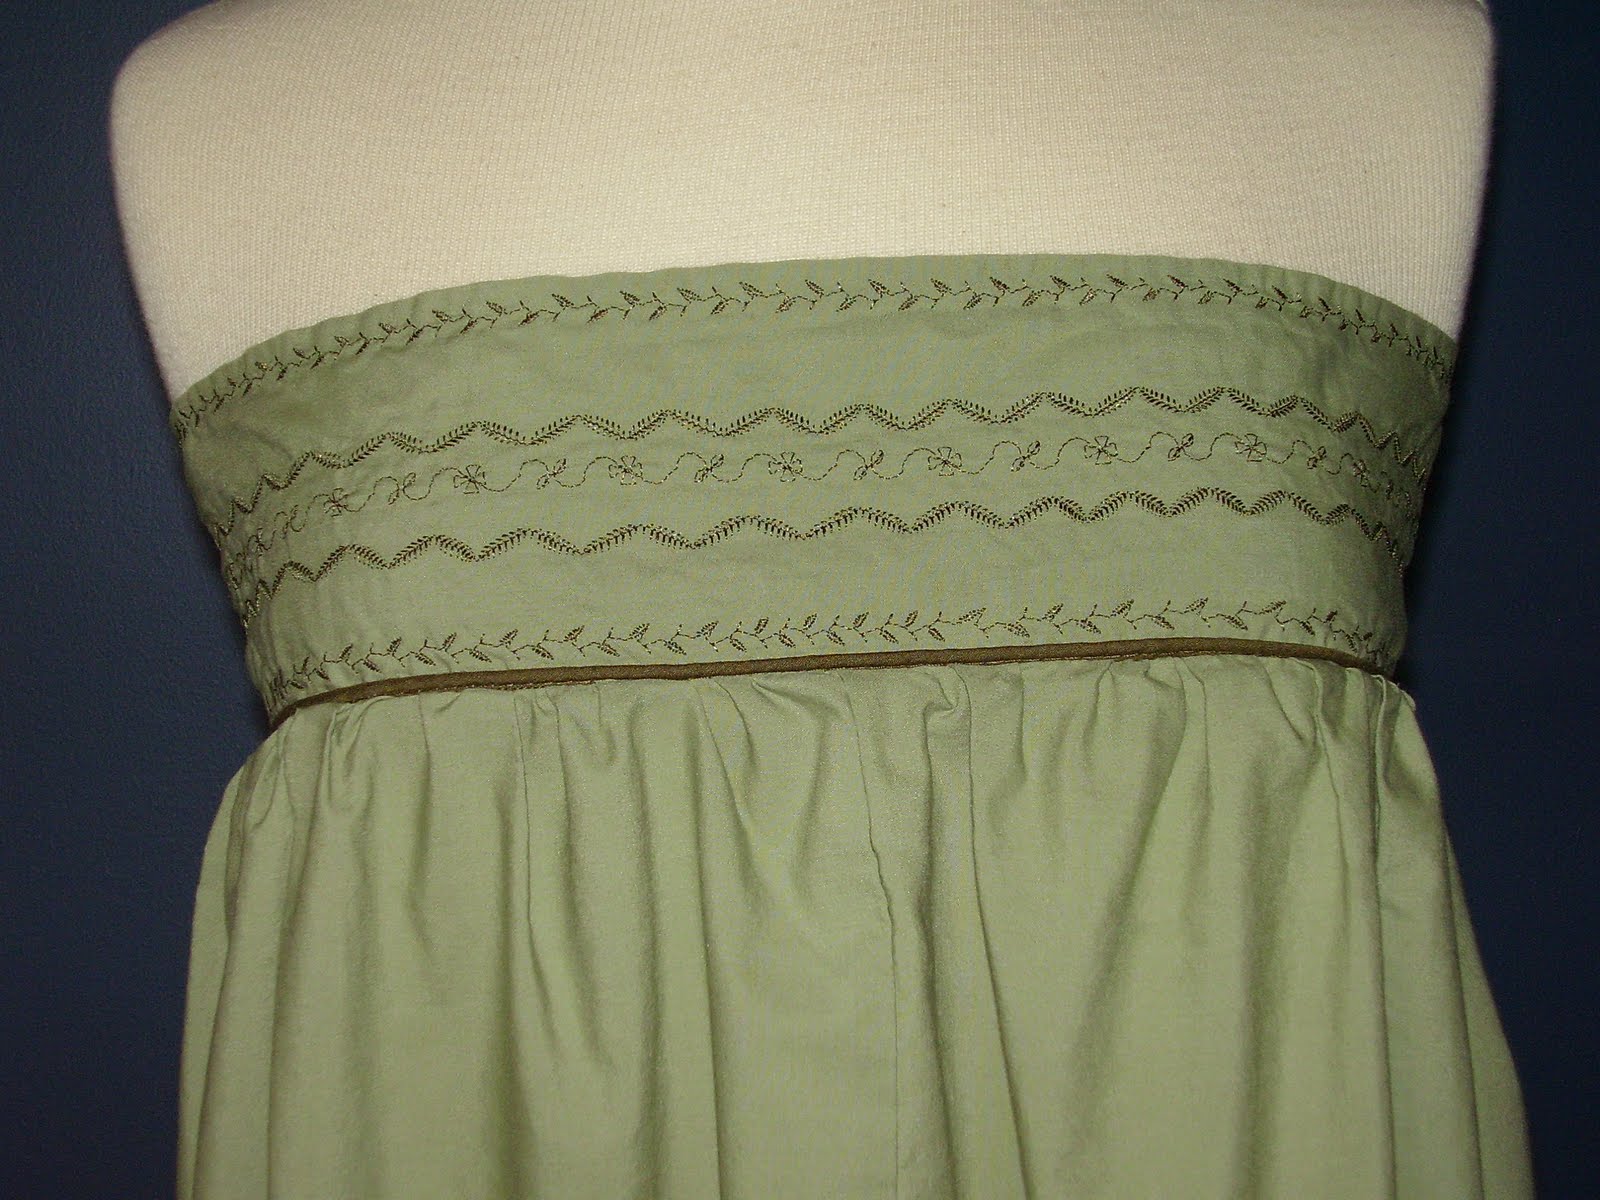
I thought you might like to see how I made a convertible skirt or strapless dress from another pair of pillowcases.  My mom gave me a huge bin of sheets and pillowcases from her overstuffed linen closet when she moved, and I have had lots of fun making things from sheets!  This time I used a plain pair, in a soft sage green.  I recently bought a new sewing machine that has a lot of embroidery stitches, and I made this to play with those stitches.


I can wear it like this, as a dress, or the way I usually wear this is as a low slung (it fits my hips) skirt.  This was super simple and fun to make.  This was my first successful attempt at using piping.  I think the bias tape hem, the piping, and the embroidery make this garment really sweet.  Mr. Green compliments me on this every time he sees it.  Here is a closer picture of the embroidery:


 Mr. Green shared his opinion that he thinks I must show this dress "with the green sweater."


I didn't make the sweater, though I wish I did.  I actually am about to start working on something similar, in brown.  I want to try Christine Hayne's jacket pattern using some yardage of a decorative, open knit I picked up on sale, lined with cotton gauze.  I am hoping it will work!  I have to dye the gauze brown first, and that sounds like something fun to do now.  Maybe I will be able to show ya'll that jacket real soon!

But back to this convertible dress/ skirt.  I  removed the doubled, hemmed pillowcase band to make the embroidered skirt band.  Then I cut apart the rest of both pillowcases, sewed them together, and gathered to fit the band, which I made to my measurement.  Then I applied the piping, and sewed the skirt to the band.  Because I had bias tape to match the piping, I used that to finish the hem, but both the piping and bias trim could be eliminated to make this easy to sew dress or skirt.

I will be back here soon.  Until then, Happy Sewing!

Sunday, June 27, 2010

More Jammies and One Yard Wonders

Have ya'll seen this book?


It's pretty awesome.  There are 101 projects, all of which can be made from just a yard of fabric.  There are things you might never think of, like a cover for a 2 drawer file cabinet, and also basic things like purses and other bags.  There are things for you to wear, clothes for babies and children, toys, gifts, aprons, even a collar and leash and coat for your dog.  Or, if you are a cat lover, there is a pattern for a darling little teepee for your feline friend.  The book is hardcover, with the pages mounted on a spiral, and all the pattern pieces store in an envelope inside the front cover.  If you haven't gotten this book yet, I encourage you to order it now.  It's perfect for stash busting!


I plan to make lots of the projects in this book, including more than one for our holiday gift making next month.  I thought I would show ya'll the short jammies I made following two of the patterns found here.  The top was designed by Rae Hoekstra, and could also be worn with jeans.  The "perfect fit" shorts pattern includes a handy-dandy formula for measuring and making shorts that fit exactly right.


I actually made these from a vintage sheet, and have enough fabric left over to make something else, too.  They were super simple and fun to make.  Don't you want to order this great book and make some for yourself too?  I appreciate your ordering through Amazon by following links on my blog.


I will see ya'll tommorrow.  Have a great night!

Recon: pillowcase pair to nightgown

This must be the absolute easiest possible way to make a nightgown.  I started with a pair of pillowcases.


Someone gave me these and I love the print, but I have already made plenty of pillowcases for my bed, so these will become a nightgown instead.  I also found part of a coordinating pillowcase in my scrap bag, left over from a previous recon.


This is just enough fabric for me to use to make the chest band and straps for my nightgown.  You could use whatever you can find in your stash; you won't need much.

So, you start by cutting the pillowcases.  Remove the side and bottom seams to make two flat panels.
Then sew these panels together at the side seams, lining up the hemmed edges, which will be the bottom of your gown.

Then make your chest band.  Measure your chest, above the bust, under the armpits.  Make the band as you would binding, by pressing in half and then pressing the raw edges under 1/4", and then sew the short ends together to make the band.

Now set your machine to its longest stitch length and sew a basting stitch around the raw edge at the top of the gown.  Pull on the bobbin threads carefully to gather this piece to fit your chest band.  Encase this inside the band, pin, and then topstitch all around to attach the band to the gown.

The last steps are the straps.  Sew them right sides together and turn.  Then you will pin them to the gown and try it on to determine placement before you sew.  Once you are happy with where the straps sit, sew them in place on the inside, near the top of the band.  Clip your threads, and you're done!


Happy sewing!

Wednesday, June 16, 2010

Chic and Simple Sewing (Book Review) and my little black dress

My sweetie ordered books for me for my mother's day gift, and I got some really great stuff.


Chic and Simple Sewing, by Christine Hayes is an amazing resource for your sewing room.  This book has at least 20 full size patterns for every season of the year.  There are dresses, tops, skirts, even jackets and a cape, none of which need zippers or buttons or any other daunting construction details.  These garments are stylish but all are really easy to make.  This book will be useful for anyone, from an experienced home sewist, to an absolute beginner.  There is an ample section at the beginning of the book that explains the basics you need to know, from equipment to laying out and cutting  patterns.  So this is the perfect book for you if you want to update your wardrobe, even if you have never made a garment before.  I love how the pattern pieces are included in an envelope in the front cover of the book, and while the book is hardcover, the pages are mounted on a spiral binder so it will lay flat on your sewing table.  I highly suggest heading over to Amazon now and ordering this for your sewing library.


While I have made a few garments before, I had never made a dress (except for this, made for a baby).  With the help of this book, I have made MY first dress, and I absolutely love it.  

I made this from the "Retro shift dress" pattern in the book.  However, instead of yardage, I was using an oversized, ugly long black linen dress from the back of my closet, and there was not enough fabric to cut it as wide as the original pattern pieces.  So I made adjustments and this dress is more fitted than the shift in the book.  I had purchased silver metallic thread to embroider on the dress, but I loved it so much as is that I decided to skip the embroidery on the dress and made a simple purse to go with it, instead.

So I am thrilled that my first dress turned out as well as it did, and I can't wait to make more of the patterns in this book.  Again, I encourage you to order your copy of this great book today.

Tutorial: men's button-down shirt to ladies (or maternity or nursing) summer top

This is an easy and thrifty way to make a comfortable, roomy summer top that would work great for maternity or nursing.  You start with a mens button down shirt, which can usually be found in a good thrift store for around a dollar.  You will also need a coordinating fabric to make the straps and bands.  I have cut up another shirt for these bands on other tops (see previous post), and for this particular shirt I am using cotton quilting scraps.  You will also need binding for the armholes.  You can make this from your coordinating fabric or use purchased bias tape.

You do not need a serger to complete this project.  However, as with most anything you sew, using the serger will improve the quality of your finished garment.  Most patterns and tutorials do not include instructions for the serger, but I am going to do so.  If you don't have a serger, skip the serger steps.  Also,  I did not go into lots of detail, assuming you know how to apply binding, etc.  If anything is not clear or if I should break it down further into more details, let me know.

Measure your chest, above your bust, from armpit to armpit
and get someone to help you do the same across your back.  These measurements are for making the top bands.

I cut my front band at 12" by 3"
and the back band 14" by 5"
If I wasn't sergering these, I would cut them about 1/2" shorter and narrower.
I like having the back band be a little wider than the front.  You really could make these bands wider or narrower, according to your preference.
 I cut my shoulder straps at 3" by 10"  HOWEVER, I have previously made and fitted this pattern for me and so I know for certain that these will not be too short.  I would advise you to cut yours longer.  They can always be trimmed if they are too long.
Cut your shirt like this:


Then you can serge all 4 sides of each band and strap as well as the cut edges of the shirt.

Then take these pieces to the ironing board and fold over 1/4" and press.  Do this on all sides of each band and strap.  Then fold each piece in half, and iron again.
Next, apply bias binding to the armholes.


You may need to trim the top of your shirt a bit more (notice I did) if the armholes are way too deep.  My shirt now has 5" between the top edge and the bottom of the armhole at this point.  We can adjust this further when taking in the side seams later.

Then, sew a long basting stitch along the top edges of the shirt.  Gather the shirt to fit the bands, and pin in place.  Then sew.
Check for fit at this time.  I cut my bands with just enough slack to fold both sides of each over narrowly towards the inside and stitch.  If you didn't, then you can enclose the outer edges of the bands inside the straps....that is why we didn't sew them yet.
Once your bands are complete, it is time for the straps.  If you do not have a dress form, then you can either pin the straps in place and try on your top until you get your straps to the proper length.  Or, you can have a loved one assist and pin the straps to length for you.
As I said, I have finished the sides of my bands and so attached my straps to the inside, so I sew my straps closed first and then sew them to the inside of my top.  If you attach the straps to encase your bands, you will leave them open, pin in place at the outer edges of the bands, and then sew them to the blouse and close them at the same time.
Now you are almost done!  Try on your top again.  The armholes on mine are too low, showing my bra under my arms.  And the shirt is too wide.  So now it is time to take in.  Try top on and pin the slack under the armholes to determine your seam line.  Then sew this seam, starting at the armhole where you marked your fit with pins, and sloping in an a-line to the hem of the shirt.  If you are making this for maternity you will make this a line slope towards the original side seam, leaving more room for you and your baby.  If you are not, then you will probably want to take in more, although this top is comfy being roomy at the bottom.
When you are happy, you will have to cut and remove the bulk at these seams.  I sew my seam on the inside of the shirt and once I am satisfied with the seam placement, I run it under the serger to trim the excess and neatly finish the edges at once.  If you don't have a serger, you can finish this seam in whatever way you want, although what I would do is sew a french seam; that is, sew the seam on the outside of the shirt and then encase that seam in a second seam line sewn on the inside.
And now you have a cute, comfy, summer top that I hope will be your new favorite!

Have fun making these for yourself.  This is one my original designs; do not sell what you make from my tutorials without my permission, please and thank you!  My etsy shop will be opening soon.


This is the first tutorial I have made, so please let me know if anything is not clear. 

Tuesday, June 15, 2010

Recon: mens' button down shirt to ladies summer top


This has been hands down my favorite top this season.  I made it from a thrifted (size L) man's shirt I had picked up for Mr. Sweetie, but he wouldn't wear it because he thought the colors were too girly.  I loved them, though, and set out to transform it into something feminine that would fit me.  I found another shirt, which was too small for me and anyway had a big hole, in my scrap bag, and I used this to make the coordinating bands.  I loved that shirt for years and it looks great with the colors in the mens shirt, don't you think?
I took the side seams in a whole lot to make the big mens shirt fit me (loosely), but this shirt would be PERFECT to make for maternity, and if I was pregnant in summer, I would make up a bunch of these.  The buttons make it perfect for nursing, too.

So, I made another one of these today and I took pictures as I worked and hope to have a tutorial for this finished and posted tomorrow.  Although it is pretty simple and I am sure you could figure out how to do it just by looking at the picture!  But I need the experience making the tutorial, and maybe it will help you to make a top you like as much as I like this one.

I am working on another tutorial, too, as well as preparing for Christmas in July, here, next month, when we will be busy making all kinds of gifts and crafts.  And between now and then we will get into some serious sewing room organization.  So please stay tuned!