Showing posts with label serger. Show all posts

Saturday, February 26, 2011

Spring Wardrobe Sewing: More Wrap Skirts and a T Refashion

Our weather is already starting to warm up.  So I put away the corduroy and fleece yardage that I haven't sewn yet; I will save those projects for later in the year.  Right now, I am sewing for Spring and Summer.

I already posted about the awesome and easy wrap skirt pattern in Chic and Simple Sewing.  But I am just loving this skirt so much that I made more.  I made a slight modification to the pattern on these, which are now better than the first three that I already showed here.  Instead of sewing the sides and then hemming the bottom, I rounded the bottom edges of the skirt and used the serger to hem the whole thing at once.  This works out better in the way that the skirt hangs, in my opinion.

First I made this one:

 
That T-shirt was much too big for me, but too small for Mr. Green, so I resized it and added elastic casings to the sleeves and the neck.  I guess this is really the first tee I have refashioned for me; I will wear it but the next tee I recon will be nicer than this turned out!  Dolly doesn't do the skirt justice, though; the length is exactly right and I love the colors...it really does look better on me than on her, I guess because my legs are so much nicer than hers!  lol

Here is another:


This skirt matches most every tee in my closet, including this blue one, which is one of my favorites.  I only had 2 yards of this patchworked shirting, and so I made the tie with a brown grosgrain ribbon.  I wear a close fitting muslin bias skirt under this.

I made one more wrap skirt, in a color (yellow gold) that I have never worn, but which says Summer happily...I will show that one later, when I have finished the top I am making up to go with it.

I know I said it before, but wrap skirts are super simple and easy to sew, and fun to wear, too.  I am excited to make some of the other dresses in Chic and Simple Sewing for Spring, too;  I hope to show those off soon, lol.

What have you been working on sewing for Spring?

Wednesday, February 16, 2011

Sew Easy Wrap Skirts for Your Wardrobe

If you haven't gotten Christine Hayne's book, Chic and Simple Sewing yet, here is another great reason to get this book.  A wrap skirt must be the absolute simplest kind of skirt to sew (if you have a good pattern), and I am loving this one. 


I made 2 of these skirts, from start to finish, before noon today. 


 This one was from the same vintage sheet I already used to make short jammies, a ruffled cafe curtain for my back door, and some heirloom seed packets and a covered canister, too!

I also finished up the first wrap skirt I started a long time ago.


This one is a little bit shorter; I messed up the hem when I tried to turn and sew it on the sewing machine, and so I had to trim it.  It is really a WHOLE LOT easier to use your serger to make rolled hems!

Last year I made lots of short bias skirts for the summer, but this year I think this wrap style will be my go to skirt pattern.  It uses 2 1/2 yards of fabric (as opposed to one yard, for the bias skirt), so this is a more ample and fuller skirt.  I am loving this skirt pattern so much for the nice swish-y effect!

There is not so much as even an elastic casing in this skirt, just straight, simple sewing- so this would be an awesome very first pattern for a new seamstress to sew.

I don't have any other yardage I can use for making more of these now, and I am restraining myself from going online fabric shopping.  But I know for sure I will be making a lot more of these wrap skirts.  This is such a classic, and yes, chic, style of skirt, that I know I will be able to wear them year after year.

There are a lot more awesome patterns besides this wrap skirt in Chic and Simple SewingHere you can see my little black dress, and here is another variation of that shift dress pattern, with sweet little sleeves.  I also made the jacket, and soon want to try out the opera and baby doll dress patterns.  You really should get this book now if you haven't!


I really appreciate you making all your amazon orders through links to Amazon on my site!  Happy Sewing!

Saturday, December 11, 2010

More Ideas for Easy Gifts to Sew

How is your holiday sewing coming along?

Even though I started in July, it looks like I will be finishing things up at the last minute yet again.  I have lots more gifts I still want to make!

Here are links to articles just published with ideas for more last-minute gifts to make:


Handkerchiefs are a great gift for your brother (or anyone else) 

Easy Gift to Make Your Husband (or another special guy)
 Trick out his sofa!

Great Gift to Make for Grandma 
(napkins)


Easy Gift to Sew for Your Kid-  roll-ups

Come back here soon for more ideas and some ideas for holiday wear for you and your kids.
Happy Sewing!

Wednesday, November 24, 2010

Napkins are a Quick and Easy Gift to Make and Sew: Here are the Easy, Easier, and Easiest Ways to make them!

Napkins are a favorite gift of mine, because they are incredibly fast and easy to sew;  make up beautifully; and especially because they are a practical gift for the Earth as well as friends or loved ones.  I only use cloth napkins in my house, but am often amazed to see that many people use paper towels every day with their meals and serve them to guests.   I want every household I know to have beautiful matching washable napkins to use instead of paper products.

Cloth napkins are some of the simplest things to sew.  You can cut them to any size, press down all the sides 1/4", then fold and press again, and then sew around the perimeter of each napkin.  I made many napkins this way and this is definitely EASY.

You can make napkins this way without even having to sew them if you use Stitch Witchery no sew hemming tape.   I haven't made them this way myself, but I have seen it written many times by different knowledgeable people that this stuff works just fine and will hold up to myriad washings.  Make them this way and all you have to do is a lot of pressing, saving the sewing step; this is even EASIER.

But by far the quickest easiest way to make cloth napkins is using your serger.  Serging napkins (and handkerchiefs) are most likely the absolute simplest, easiest, and quickest projects possible.  You don't have to turn and press edges at all!  Just cut your napkins and run them under the serger.  You could make multiple sets in half an hour.  I like to use the rolled hem with most fabrics, or a picot edge finish also looks lovely.
Serging napkins is definitely the EASIEST way to make them!

If you make 12" square napkins, which is an oversized cocktail or casual (lunch) size, you can make a set of 8, as well as simple little bag to wrap and present and contain them, from just one yard of fabric.   Here are some made in this size from festive holiday fabric:


I made a set of these as my gift for the holiday bloganza, and sets to give as hostess gifts during the holiday season.

I also just made some from this gorgeous fabric, using metallic thread in the upper looper.  I have found metallic thread to be impossible to sew with using a sewing machine, but it works beautifully in the serger loopers.  Because this fabric made me think of celebrations so much, I used the leftover scrap to make a wine bottle carrier as well, and Mr. Green had the good idea for me to use insulated batting so it can help carry a chilled bottle of wine.  Wouldn't this set make a beautiful hostess gift for New Years Eve?  This set is for sale.


(I haven't sewed the straps on the wine bag yet)

Flannel makes super soft napkins.


I want to get more flannel to make large sets of large sized napkins like these.

I also like to make 16" napkins as my favorite size.  I just cut a stack of poinsettas with gold that I want to keep for my table. ;)


 Sew, No-Sew, and Serger are Easy, Easier, and Easiest ways to make fabric napkins which are quick, useful, and can be gorgeous gifts.  Ya'll make some for your holiday gifts, too!

Happy Sewing!

I am linking this post at these parties:


mmm button


giveaways


Tuesday, November 16, 2010

Easy Gift to Sew: Prudent Baby's Fat Quarter Apron

I have had such fun making these Fat Quarter Aprons (tutorial at Prudent Baby).  This is definitely one of the easiest and most fun tutorials I have come across this year.   This project would make a great gift for domestic types on your list. 

Here is the first one I made:


I did one thing different from the tutorial, which is use the entire fat quarter for the skirt of the apron, and use the contrasting fabric to make the waist band at the top.  Instead of using ready made trim, I used the contrasting fabric to make a ruffle.  I finished the ruffle in contrasting (dark green) wooly nylon thread with a serger rolled hem.  Here is a closer picture of the green rolled hem:


I REALLY love this apron!  It reminds me of bubbles and makes me want to wash dishes!

Then I made another one, too, from fabric I have been saving for just the right project.   I had a lot of fun with the applique on this; I will be doing lots more applique, I think.  I used wonder under and then sewed the edges using a satin stitch, except for the butterfly (fussy cut from a scrap of fabric), which I sewed using invisible nylon thread:


There is a slideshow at Prudent Baby with 100 different photos of aprons made by many talented people; you should check out for some serious inspiration for all kinds of different ways to make these unique.

I can't believe I didn't see any examples made for men.  I have an idea to use masculine fabric (without the ruffle) and applique "DAD" on one side.

You could make one with a pocket and slide in a new wooden spoon.  Or maybe make a matching set for a mother and daughter (or sisters).  Or make one (or more) reversible. There are myriad ways to make this a great gift!  Have fun with it!

Happy Sewing

I am linking this here:

Monday, November 1, 2010

My Best Bias Skirt Yet- and it's a Convertible Dress

I think corduroy is probably my favorite thing about fall.  I was thrilled to get several yards of this fine wale indigo dyed corduroy, and I really love this long bias skirt I made from it.


Yep, I cut this cotton corduroy on the bias, and it worked out just fine.  I drafted this pattern myself, using the one-yard wonders bias skirt pattern as a guide at the top.  I know this is going to be my favorite skirt I have made for myself yet.  But what is even better is that it doubles as a dress!


I love the weight of this cotton corduroy, which is not too heavy, and I can totally see wearing this over my bathing suit (or just as a dress) at the end of the day in summer.  I predict I will be making a navy swimsuit when spring fever starts to set in early next year!

I finished the bottom hem of this skirt with narrow regular serging (after I broke two heavy duty needles trying to roll the hem on this corduroy) and then I used this special ric rac-ish trim over the serged edge.  This skirt could not have been easier to sew.   If you have the same (or nearly the same) chest and hip measurements, as do Dolly and me, then you can easily make a 2-in-1 convertible long skirt and dress, too.

I had more of this fabric and next I will show you my jacket....

Happy Sewing!

Thursday, October 28, 2010

My Favorite Bias Skirt from One Yard

I keep showing ya'll the awesome projects I have made following patterns in the book One-Yard Wonders, because I know ya'll would like to make them too.

I am not sure how I haven't said much yet about the bias skirt pattern in this book, because this has been my most loved and favorite project I have made from the book yet.

I have made 6 or 7 of these bias skirts and worn one most every day for months now.  Here is my most favorite:


Besides the awesomeness of making a skirt from just a yard of fabric, this skirt pattern is super easy, too.  If you use your serger to roll the hem, as I do, you can make one in under half an hour.  The bias cut is super flattering and the elastic waist is most comfortable for a skirt.  I have found that this pattern, cut just a tiny bit smaller, makes an excellent half slip, too.   This pattern alone has been worth the price I paid for this book.

As you all know, I highly recommend this book chock full of (101) easy sewing projects to wear, use, and give as gifts.  If you haven't yet, you should buy it now

I will be back soon; Happy Sewing!

Wednesday, August 4, 2010

Easy Summer Seperates To Sew

I just made this top, using Simplicity pattern 3750

 
 And here is the back:


It is not really uneven in the back; I didn't notice it needed to be pulled down before I took the pic!

This is the first top I have made following a pattern, other than the pajama top in One Yard Wonders.

I made this top more complicated than it needed to be by choosing the striped print.

This is an easy pattern to sew, for sure.  It has a lot of sleeve options, too.  I am excited about making one  with the "groovy" long sleeve option.   That will go with a long bias cut skirt I have already cut out and I cannot wait to show that completed outfit, which is for fall.


I have been wanting to show ya'll the bias cut skirts from One-Yard Wonders, but wanted to show a whole outfit made by me, and not just a bunch of skirts.  And so I bought the fabric for this top, along with some special blue linen to make the skirt.  But the linen has flower embroidery (in the same shade) and is gorgeous, but needs a plain blouse.

Dolly IS wearing a bias cut skirt in the photo, but I made that one from a sheet as a little slip to wear under a floral circle cut skirt I made from another sheet....

But I digress.  lol  The big mistake I made in sewing this pattern was not paying enough attention to the instructions and sewing the bias tape to the strap and back pieces before sewing them together.  So there is a seam at the neck, which should have been seamlessly bound.  And the contrast band could have looked neater.

I also choose one size too large, apparently.  If you haven't followed a pattern before, please be aware that you definitely will need to make a different size than you normally buy.  I wear a size 6 dress if I buy it from a store, but a garment made from a size 6 pattern would not go over my thigh.  The back of the pattern has measurements, and I did consult them.  I even measured myself again, to be certain my measurements had not changed.  So I choose and cut my size according to the stated measurements, but it is too loose under the arms and in the chest.  I am going to take it in better, but when I repeat this pattern, I will be cutting a smaller size, for sure!

I am pleased in general with how this top turned out (Mr. Green complimented on it before it was even finished and has commented he likes it several times), and I will definitely be wearing this and make the pattern again, especially with the sleeve variations, which I am eager to try.  And I definitely learned several things during the process.

I also really want to tell ya'll about the bias cut skirts from the book
One-Yard Wonders: 101 Sewing Fabric Projects; Look How Much You Can Make with Just One Yard of Fabric! 
In case you haven't figured it out; I really recommend adding this book to your sewing library.
This one pattern alone has been worth more to me than the price I paid for that book.  It is a one piece pattern and super simple to sew.  Because I have a serger to roll the hem, I can sew one in literally 10 minutes.

Here is the very first one I made.


I couldn't find my tie dye to show you today, but when my mama brought me this vintage sheet, I immediately thought of my favorite old tie dye I made with rit dye that has the same faded shades of brown and orange.  That tie dye and this skirt have been my favorite outfit for around the house all summer.  I used another soft cotton sheet to make the bias skirt pattern in a smaller size to wear underneath as a slip, and it makes for a breezy, comfy, cool skirt.  You can see another one cut out on the line in the window.  I need to get brown thread for the serger before I hem that one.  You don't need a serger at all to make this easy skirt, however.  You can make one from a yard of 60" wide fabric.

You will be seeing other versions of this skirt by me (including the embroidered linen and a special long version) soon, as I complete tops to go with them.

There is a sewing and needle book in that last photo, on the stack on the sewing desk.  I have only a couple steps left on that and the tutorial for those should be up soon.


I hope you all have a great day today; Happy Sewing!

Tuesday, August 3, 2010

Quick Gift Idea: Glasses Cases

Hi Ya'll.

Here is a super quick, super easy gift to sew.  I made one tonight to enclose within the folklore bag I made for a friend.  The One Yard Wonders book called for the yard to be used as the lining too, and by using another fabric to line the bag, I was able to save a nice bit of the bag fabric for more than one project like this.


I used the serger to finish the outside of the flap.  This was the tightest curve I have serged, and I had to go over it again....so it is not as neat as I wished it was, but it looks nice and pretty.

Glasses cases are the kind of simple project that you can whip up quickly and you don't need a pattern or tutorial.  The ones I have made in the past have been as simple as a rectangle...you really don't need a flap.

Here is mine, which I made from the leftover fabric from my sewing machine and serger covers.  My great great grandmother bought this polyester prequilted patchwork print fabric and my mother gave it to me, so it is a special fabric for me.


And then here is Mr. Green's.  I have made a total of 4 gifts (he got this - and other things-  for father's day) from this guitar print shirt that fit no one here!


I learned from this one that it is probably better not to use the serger on small projects you are going to turn!

I don't need to make more of these for gifts now, though, and that is why I showed you ours, too.  I do plan to make another glasses case for a Christmas gift, to go in another purse I plan to make, but those will be done on the Knifty Knitter looms.  I will show them after I make them.

I think a handmade glasses case would make a nice teacher gift, or for an uncle or aunt or grandpa... just about anyone could use a soft quilted holder for their glasses or sunglasses.  And you can make these up in a flash, so it is definitely an easy gift to sew to keep in mind!

I promise to be back really soon with another project.

Wednesday, July 7, 2010

Gift Idea: Colored Pencil/ Crayon/ Marker Rolls

I am sorry I am late with this post.  Tuesday was a high intensity Mama day, as it rained, keeping my big boy inside, and my little guy wanted Mama to hold him all day.  I wasn't able to even go in the sewing room until nearly midnight. And then, once I started making these, I kept thinking of someone else who would like one.

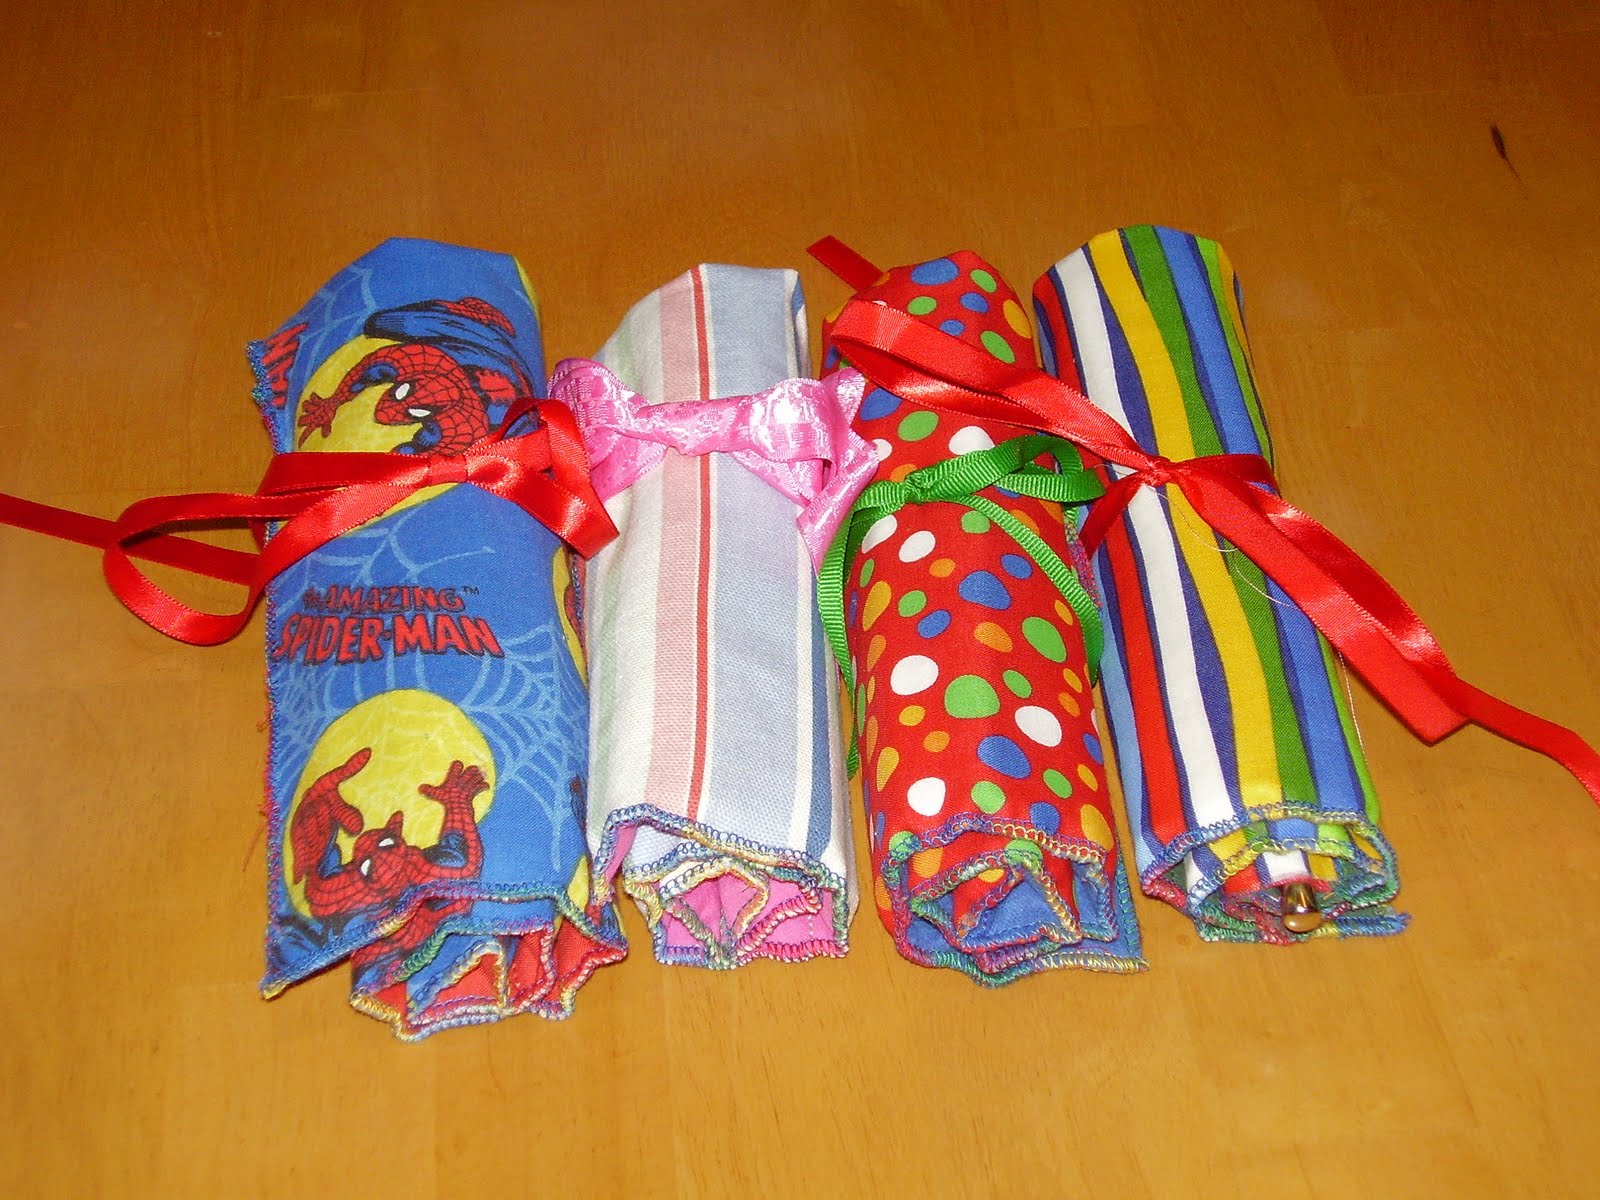
There are a lot of colored pencil roll tutorials to choose from, and every one I have seen is super cute.  I started with one from Carson J. Designs, although I made a couple changes.  I didn't have a cord stop, so I used ribbon instead.  And I also added an inner layer.  I have seen some tutorials call for a layer of flannel or fusible fleece.  I used what I had, which was a piece of canvas curtain.  I also used the serger to finish the edges, instead of turning...this speeds things up a lot.   Here is a view of the inside of one I made tonight:


And then I made three more.  The Spider Man is for a particular neighbor boy who is always wearing either one of two pairs of Spider Man shoes, or one of what must be a dozen different Spider Man shirts:


There are other tutorials for beautiful colored pencil rolls at You Go Girl  and  Pink Chalk Studio, and possibly elsewhere, as well.

After I finished these, I decided to do crayon rolls.  I had seen pictures of precious rolls at Skip to My Lou, but the little boys I am making these for will need the fat kind of crayons.  So I just kindof adapted the rolls I had just made, cutting the rainbow strips at 2" x 9":


I thought these should definitely have a fold down flap, to prevent the crayons being spilled in Mama's purse.
Here they are all rolled up:


I got all six of these gifts made in just about two hours, so you can see that these are quick and easy projects.  I really like sewing the rainbow strips together; it's like making a little quilt.

It is 3 am now, so I must go to bed.  If it wasn't so late I would like to make Fawnda's marker roll; there is a tutorial at Fireflies and Jellybeans.  I would like to make one of these for my sharpies, as well as some for gifts.  But that will have to be another day!

If you haven't seen my giveaway yet, please read this post.   Next Monday my baby will draw a name from a hat to determine the winner of my patchwork needle book/ sewing kit.  You need to comment on that post, or be a follower of this blog, for your chance to win it.

I am going to bed!  I hope to see ya'll tomorrow.

Monday, July 5, 2010

Gift Idea: Car Rolls

 I had plenty fabric left from that firetruck crib sheet that I used to make the toy box, and I decided to use it (along with pieces from 2 other sheets and a salvaged jeans leg for the road section) and make a car cozy.  I have made one of these before, using the great tutorial at My Little Gems.


I kept thinking as I was turning this right sides out that the process could be speeded up with the serger.  So I made another one in less than half the time, using rainbow variegated thread to finish the edges.


My baby will be ready for hot wheels by December, so I think he will just love this.  We also have a lot of sweet little boys on our street, so I am about to go back in my sewing room and use the rest of these fabrics (there is still more left of that crib sheet), to make at least a couple more.  These would make a great birthday gift, too, especially if you had one or two already made and could just grab it and go to a party.  They are perfect for slipping into Mama's purse so she has a great diversion to offer her boy while out and about.

There is also another beautiful tutorial for another way of making these at Homemade By Jill.  I haven't made one this way yet, but I have a piece of natural duck cloth and some paints and can think of a lot of fun ways to do this one.  Maybe I will try her way next.

And here is another variation on this project, this time at The Trendy Treehouse.  I just now saw this, and like me, I am sure you, too will see many fun possibilities for decorating this one.  I think I am about to break out my paints!  I hope ya'll have a great day!

Did you see this post yet?  I am giving away a sewing kit/ needle book made by me on Monday; you need to comment (or be a follower of this blog) for your chance to win it.

Friday, July 2, 2010

Crib Sheet to Toy Box Recon

Ever since I first heard about the Iron Crafter Challenge and the secret ingredient of sheets, I have been thinking about this crib sheet:


This will be my second entry in this challenge.
I removed the elastic from the edges and cut the corners so I could press the crib sheet before taking this picture.  My baby loves trucks and is quickly amassing quite the collection.  He really needs a box for his "cars" and I think this will be just the project for this sheet.  I also have some other sheets.


At first I wasn't sure which to use for this project, but the red sheet has already been cut and I have some navy bias tape I could use for the top edges.

So, you need the crib sheet (or whatever) and another sheet or pillowcase (or whatever) to use for the lining, some bias tape, which you can easily make from your sheet if you don't have any, and sheets of needlepoint canvas.  I used these because I had them, and because I want my box to be sturdy enough to stand up well.

Start by cutting 5 squares measuring 5 3/4" each,  from the crib sheet.  You also need 5 squares (again, 5.75") for the lining, and 5 squares of cotton batting.  I cut my batting squares a little bit larger, just to be safe.


Take one lining square and one front square and line them up right sides together, and then lay down one of your batting squares on top.  Sew with a 1/4" seam allowance on three sides, leaving the entire 4th side open for turning.  Now, you could just trim the edges and press and turn.  But I like to use the serger and I want to show you what it can do.  So, after I sew my 1/4" seams, I run them quickly under the serger.    I want to show you a picture, but I had a hard time taking one while serging.  It's blurry, but I will show you and hope you can see.  Notice at the top what has already passed through the serger has been trimmed neatly with the edges wrapped in thread.  At the bottom of the picture, you can see all the excess batting that is being trimmed as it goes into the serger.


Like I said, I am sorry this picture is so blurry!  Here you can see how nice and neat this looks after I have sergered all three sides:


So, do this on all 5 panels, and then turn them and press.  Then you will take a piece of the needlepoint canvas and trim it just small enough to slip into the panel.  Trim it on the top edge short enough that there will be enough room on the top edge to sew the binding on the machine without the needle hitting the canvas.  So, you use your bias tape to close up the open end on each panel.  Skip the bias on one panel and just turn under your raw edges and topstitch.  Now you have 4 panels like this (and one without the bias binding):


I have decided to reverse my bottom panel, so the firetrucks will show and the red will be on the floor.
Now you want to sew four side panels along their bottom edge to all four sides of the bottom square:


Now, this has all come together quickly.  But because of the plastic panels inside, I have decided I will have to hand sew the sides together.  So thread a needle and sit down and carefully and neatly sew up three of the sides.  Catch the lining on both sides with your needle, right at their edges.  On the fourth side seam, sew a little more than halfway up, and then stop, leaving your needle still threaded.


Now you want to turn the box outside out before finishing this last seam.  I will tell you it was scary turning this; I was afraid of the plastic panels cracking....but it turns just fine, just have patience and go slowly.  Once you get it turned, finish sewing the side seam and tie off.  And Voila:

Toy Box from a Crib Sheet

You can see he has already pulled out a truck.  He likes his new toy box and has moved it into the other room and emptied and refilled it and emptied it again.  I am glad its roomy enough to hold all his trucks and more and I am sure that any little boy would be happy to have a box filled with trucks!  Plus, I see endless variations on this.  You could use something pretty and make a bin for your crafts.  Or what about making another panel with a flap to make a velcro-able lid and then having pockets on the outside or inside (or both).  You could make a little flap to secure it around a seatbelt and have a neat place to store books and toys between kids in your car.  Or make more, in graduated sizes, and then they could stack and nest.

I hope you will make one or many neat boxes and I know you will have fun!  Have a great day!